
Heavenly Oreo Cookie Truffles Recipe You Must Know
Sweet temptations meet their match with these creamy Oreo cookie truffles that melt in your mouth.
Chocolate lovers rejoice as simple ingredients combine to create an irresistible treat.
Each bite promises rich, velvety decadence that dances between crunch and smoothness.
No baking skills required for this delectable dessert that looks professionally crafted.
The recipe delivers indulgent magic in just a few steps.
Chocolate-coated and sprinkled with love, these truffles will become your new favorite no-bake sensation.
One taste, and you’ll be hooked on this ridiculously easy, crowd-pleasing dessert.
Quick Recipe Overview

Ingredients for Oreo Cookie Truffles
For Cookie Base:For Coating and Decoration:For Additional Ingredients:Equipment for Crushing, Mixing, and Dipping
How to Make Truffle Bites Without Fuss
Grab your favorite Oreo cookies and crush them into fine crumbs using a food processor. The goal is to create a smooth, even texture that will blend perfectly with cream cheese.
Mix the cookie crumbs with softened cream cheese, ensuring everything combines into a rich, delectable blend. The mixture should feel slightly sticky and hold together easily.
Roll the chilled mixture into small, uniform balls. Place them on a parchment-lined tray, making sure they’re compact and smooth.
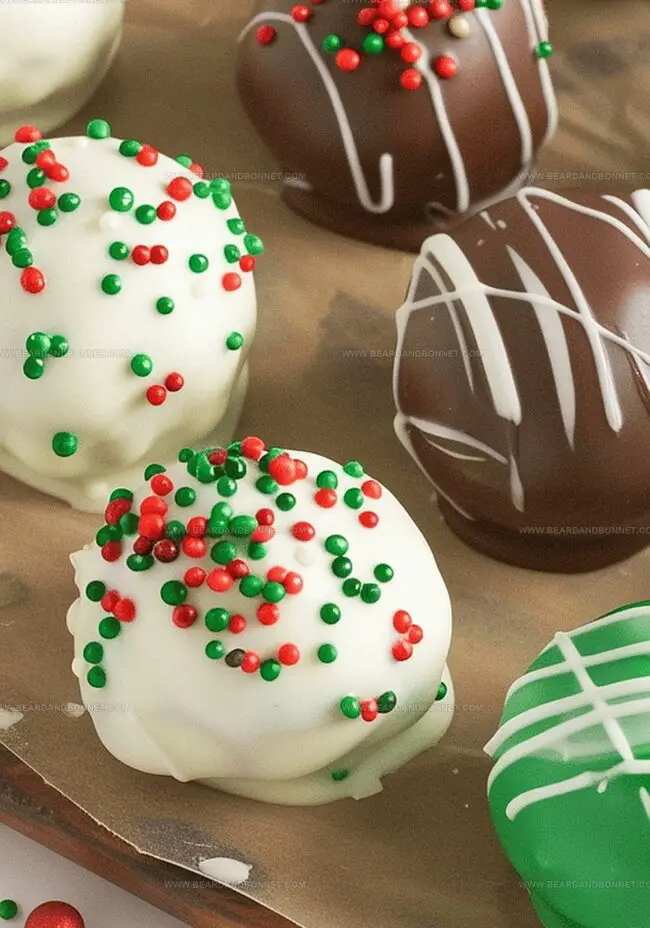
Melt white and dark chocolate in separate bowls. Carefully dip each truffle, allowing excess chocolate to drip off. This creates a glossy, even coating that looks professional and delicious.
Sprinkle holiday-themed decorations over the chocolate-coated truffles. Add colorful candy melts or festive sprinkles to make them look extra special and enticing.
Let the truffles set in the refrigerator until the chocolate hardens completely. This ensures a perfect texture and helps the decorations stick beautifully.
Coating Tips for That Chocolatey Finish
Serving Oreo Truffles at Parties or Gifts
How to Chill and Save Oreo Truffles the Smart Way
Print
Heavenly Oreo Cookie Truffles
- Total Time: 45 minutes
- Yield: 25 1x
Description
Homemade Oreo Cookie Truffles deliver a rich chocolate experience with minimal ingredients and maximum flavor. Simple cream cheese and crushed cookie crumbs create an irresistible treat you can quickly prepare and enjoy.
Ingredients
- 1 lb 4 oz (567 g) oreo cookies
- 8 oz (226 g) cream cheese, softened
- 8 oz (226 g) white chocolate almond bark or chocolate chips
- 8 oz (226 g) semisweet chocolate almond bark or chocolate chips
- milk chocolate candy melts
- white chocolate candy melts
- 1 tsp vanilla extract
- christmas sprinkles for decoration
- red food coloring
- green food coloring
Instructions
- Preparation: Pulverize Oreo cookies into ultra-fine crumbs using a food processor, creating a consistent powdery texture perfect for truffle formation.
- Mixing: Blend softened cream cheese and vanilla extract with cookie crumbs, kneading until a seamless, pliable dough emerges that holds together effortlessly.
- Chilling: Refrigerate the mixture for 15 minutes, allowing the consistency to stabilize and become more manageable for precise shaping.
- Forming: Craft uniform truffle spheres by scooping and rolling the chilled mixture between palms, creating smooth, symmetrical orbs with gentle pressure.
- Freezing: Position truffles on a parchment-lined tray and freeze for 20 minutes to ensure structural integrity during the chocolate dipping process.
- Chocolate Coating: Melt white, milk, and semisweet chocolates in microwave-safe bowls, stirring meticulously to achieve a glossy, smooth liquid consistency.
- Decorative Preparation: Divide white chocolate into three portions, tinting one forest green and another festive red while preserving the original white hue.
- Dipping and Decorating: Submerge each chilled truffle into melted chocolate, allowing excess to cascade off, then artfully adorn with holiday sprinkles and colored candy melt drizzles.
- Setting: Allow truffles to solidify completely at room temperature or within the refrigerator until the chocolate coating becomes firm and glossy.
Notes
- Chill for Perfect Shape: Refrigerate the mixture for 15 minutes to make handling and shaping truffles easier, preventing sticky and messy preparation.
- Melt Chocolate Carefully: Use microwave in short bursts, stirring frequently to avoid burning and achieve a smooth, glossy chocolate coating for professional-looking truffles.
- Use Parchment Paper: Line baking sheets with parchment paper to prevent sticking and ensure easy removal of truffles during freezing and chocolate coating stages.
- Handle with Clean Hands: Keep hands slightly damp while rolling truffles to create smooth, uniform spheres and prevent excessive sticking during the shaping process.
- Prep Time: 30 minutes
- Cook Time: 15 minutes
- Category: Desserts, Snacks
- Method: Blending
- Cuisine: American
Nutrition
- Serving Size: 25
- Calories: 160
- Sugar: 14 g
- Sodium: 90 mg
- Fat: 9 g
- Saturated Fat: 5 g
- Unsaturated Fat: 3 g
- Trans Fat: 0 g
- Carbohydrates: 19 g
- Fiber: 1 g
- Protein: 2 g
- Cholesterol: 10 mg
Jessica Martin
Recipe Developer & Food Writer
Expertise
Recipe Development, Food Styling and Photography, Seasonal and Local Ingredients, Vegetarian and Vegan Cuisine, Culinary Education
Education
Portland Community College
Oregon Culinary Institute
Jessica Martin is a talented food writer and recipe creator who specializes in seasonal cooking and approachable home baking.
Educated at Portland Community College with additional pastry training from Oregon Culinary Institute, Jessica’s culinary journey spans nearly a decade of creating and sharing flavorful recipes.
Her deep appreciation for local ingredients shapes each of her recipes, making them both accessible and inspiring. At Beard and Bonnet, Jessica uses her cheerful, down-to-earth writing to help readers effortlessly bring new tastes and creative dishes into their daily routines.