Festive Holiday Cookie Platter Recipe

Festive Holiday Cookie Platter Recipe for Joy-Filled Gatherings

Sweet aromas of warmth and joy dance through kitchens during festive holiday delight cookie platter season.

Classic treats sparkle with nostalgic memories of childhood celebrations.

Butter, sugar, and spices blend into delectable morsels that beckon everyone around the table.

Rich textures and golden edges promise comforting indulgence with each carefully crafted bite.

These cookies carry more than flavor – they weave stories of connection and shared moments.

Generations have treasured these recipes, passing down traditions one delicious cookie at a time.

Gather close and savor the magic baked into every delightful morsel.

Quick Recipe Overview

Prep Time: 25 minutes

Cook Time: 15 minutes

Total Time: 40 minutes

Calories: 220 kcal

Servings: 13

For Dipping And Coating:
  • Chocolate Wafers: Smooth melting base that creates a luxurious glossy shell for cookies.
  • Milk Chocolate: Rich and creamy coating that provides classic sweet flavor.
  • Dark Chocolate: Deeper, more intense chocolate experience with slightly bitter undertones.
  • Green Candy Melts: Vibrant festive color perfect for holiday theme and smooth melting properties.
For Decorative Elements:
  • Sprinkles: Colorful texture enhancers that add whimsy and playful holiday touch.
  • Candy Eyes: Adorable embellishments that transform cookies into cute characters.
  • Red M&M Candies: Bright accent that creates playful reindeer nose detail.
  • Green Sanding Sugar: Sparkly crystalline topping providing festive shimmer.
  • Red Heart Sprinkles: Delicate romantic element adding extra visual interest.
For Specialty Ingredients:
  • Wafer Cookies: Crisp, light base that provides perfect canvas for chocolate decorations.
  • Pretzels: Crunchy twists serving as creative reindeer antler substitutes.
  • Peppermint Pieces: Refreshing flavor burst with cool, minty crunch.
  • Parchment Paper: Non-stick surface ensuring easy cookie removal and clean workspace.
  • Double Boiler or Microwave: Essential for smoothly melting chocolate without burning.
  • Baking Sheet: Needed for cooling and setting decorated cookies.
  • Parchment Paper: Prevents sticking and makes cleanup easy.
  • Spatula or Spoon: Perfect for stirring melted chocolate and spreading evenly.
  • Small Bowls: Great for holding decorative toppings like sprinkles and candy.
  • Dipping Fork or Tongs: Helps coat cookies in chocolate neatly and precisely.
  • Chocolate Melting Magic

Gently transform chocolate into a silky smooth liquid by heating it carefully. Stir frequently to prevent burning and create a luxurious glossy texture.

  • Cookie Dipping Wonderland

Dive each wafer into the melted chocolate, coating them with a rich, decadent layer. Let excess chocolate drip off for a perfect, even coverage.

  • Festive Cookie Transformation

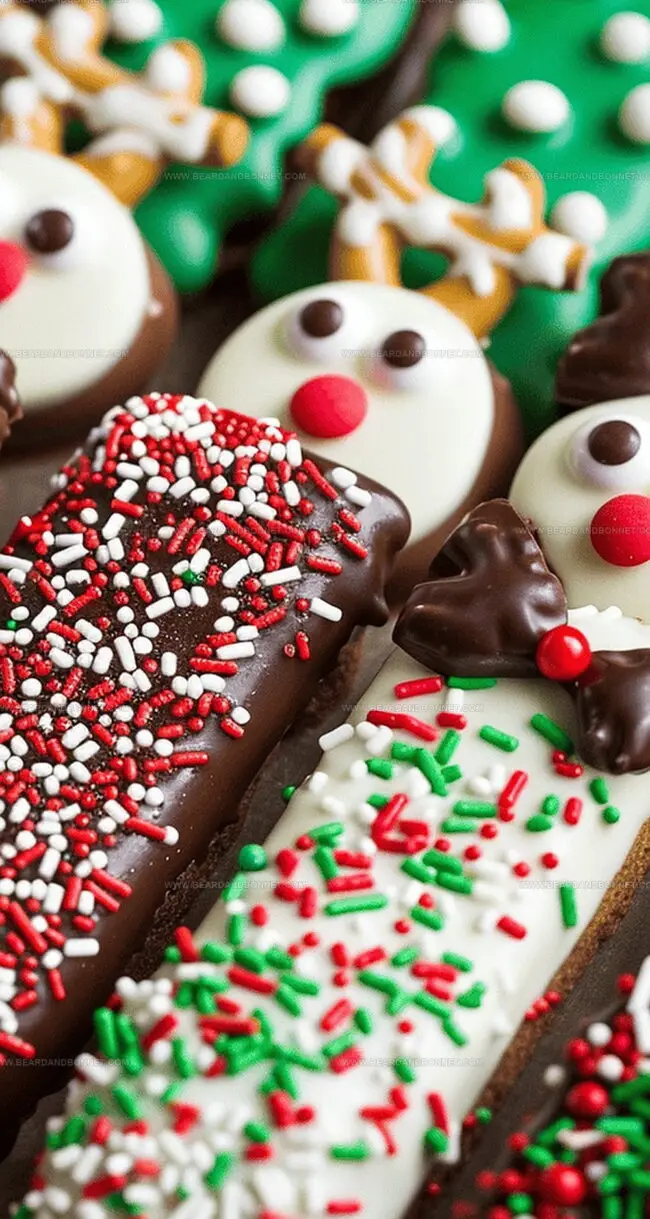
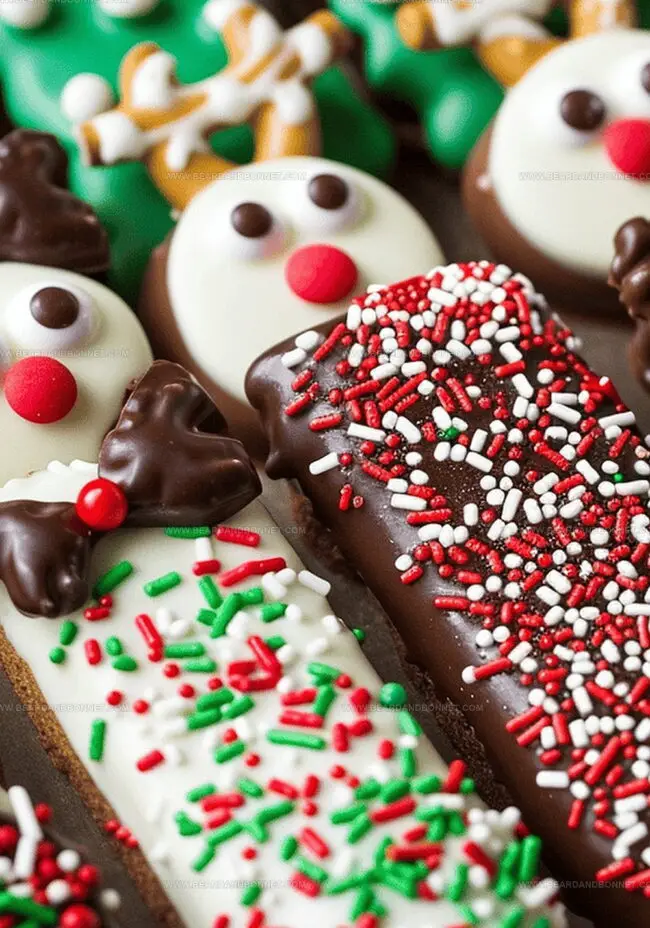
Sprinkle playful decorations onto the chocolate-covered cookies before they cool. Add sparkly sugar, colorful sprinkles, or tiny candies to create magical designs.

  • Reindeer Cookie Cuteness

Craft adorable reindeer faces by attaching pretzel antlers, candy eyes, and a bright red nose. Transform ordinary cookies into whimsical holiday characters.

  • Holiday Color Explosion

Create vibrant green cookies using candy melts. Dust with shimmering sugar and add festive accents that capture the holiday spirit.

  • Peppermint Bark Surprise

Spread melted chocolate on a flat surface and scatter peppermint pieces across the top. Break into irregular pieces for a rustic, homemade treat that melts in your mouth.

  • Quick Chocolate Dipping Magic: Keep chocolate smooth by using a double boiler or microwave-safe bowl, stirring frequently to prevent burning and ensure a silky texture perfect for coating cookies.
  • Sprinkle Station Strategy: Set up a dedicated decorating area with small bowls of various sprinkles, sanding sugars, and candies before starting to dip cookies, making the decorating process faster and more organized.
  • Temperature Control Trick: Let chocolate-dipped cookies cool at room temperature or briefly chill in the refrigerator to help chocolate set quickly and maintain a glossy finish without developing white streaks.
  • Festive Cookie Transformation: Transform plain wafer cookies into holiday masterpieces by mixing different chocolate colors, experimenting with layered decorations, and creating playful character designs like reindeer or snowmen.
  • Flavor Fusion Fun: Experiment with flavor combinations by adding peppermint extract to melted chocolate, using colored candy melts, or sprinkling crushed candy canes for an extra festive and delicious twist on classic chocolate-dipped cookies.
  • Party Presentation Platter: Create a stunning holiday cookie display by arranging the decorated wafer cookies in a festive circular pattern on a large decorative tray, alternating colors and designs for maximum visual impact.
  • Sweet Gift Packaging: Package the cookies in clear cellophane bags tied with festive ribbons, perfect for giving as homemade gifts to friends, neighbors, or holiday party hosts. Add a personalized gift tag for an extra special touch.
  • Hot Cocoa Companion: Serve these delightful cookies alongside warm mugs of peppermint hot chocolate or classic holiday eggnog. The chocolatey, decorated cookies make an amazing dunking treat that will delight both kids and adults during cozy winter gatherings.
  • Dessert Table Showstopper: Use tiered cake stands or elegant platters to showcase the variety of reindeer, green festive, and peppermint bark cookies. Mix heights and textures to create an eye-catching dessert display that will be the centerpiece of any holiday party.

How to Store Cookies From the Platter

  • Cookie Batch Preparation: Plan ahead by creating multiple batches of cookies in one session. Stack different chocolate-dipped varieties in separate containers to maximize kitchen efficiency and save time during busy holiday weeks.
  • Chilling Strategy: Refrigerate decorated cookies for 10-15 minutes to help chocolate set quickly and maintain crisp designs. Cold temperatures help toppings adhere better and prevent accidental smudging during handling.
  • Smart Storage Solutions: Keep cookies in airtight containers with wax paper between layers to prevent sticking. Store in cool, dry locations away from direct sunlight to maintain chocolate's smooth texture and prevent melting.
  • Freshness Timeline: Enjoy chocolate-dipped cookies within 5-7 days for optimal taste and texture. Room temperature storage works best, with ideal conditions between 60-70 degrees Fahrenheit to preserve cookie quality and prevent chocolate bloom.
Print
clock clock iconcutlery cutlery iconflag flag iconfolder folder iconinstagram instagram iconpinterest pinterest iconfacebook facebook iconprint print iconsquares squares iconheart heart iconheart solid heart solid icon
Festive Holiday Cookie Platter Recipe

Festive Holiday Cookie Platter Recipe


5 Stars 4 Stars 3 Stars 2 Stars 1 Star

4.7 from 18 reviews

  • Total Time: 40 minutes
  • Yield: 13 1x

Description

Scrumptious holiday delight cookie platter delivers festive cheer from classic butter cookies to chocolate-dipped treats. Festive flavors and delicate textures invite winter celebration with family and friends you’ll cherish.


Ingredients

Scale
  • 12 oz (340 g) melting chocolate wafers
  • 12 oz (340 g) milk or dark chocolate
  • 12 oz (340 g) green candy melts
  • 30 sugar wafer cookies
  • 1 cup peppermint pieces
  • 12 oz (340 g) pretzels
  • Red M&M candies
  • Candy eyes
  • Sprinkles
  • Green sanding sugar
  • Red heart sprinkles

Instructions

  1. Chocolate Mastery: Melt chocolate using a double boiler or microwave, stirring consistently to achieve a silky, lump-free texture.
  2. Cookie Enhancement: Dip wafer cookies into molten chocolate, coating three-quarters of each cookie. Gently remove excess chocolate, ensuring an elegant, even layer.
  3. Festive Decoration: While chocolate remains wet, embellish cookies with sprinkles, edible glitter, or crushed candy canes. Arrange decorated cookies on a parchment-lined tray to solidify.
  4. Whimsical Character Design: Transform cookies into charming reindeer by positioning pretzel pieces as antlers, attaching candy eyes, and adding a vibrant red candy nose.
  5. Chromatic Holiday Variation: Create colorful variations using green candy melts, coating cookies uniformly. Elevate their festive appeal by sprinkling green sanding sugar and tiny red heart-shaped decorations.
  6. Peppermint Bark Crafting: Spread melted chocolate on a parchment sheet to form a smooth base. Scatter crushed peppermint pieces across the surface. Allow complete solidification before breaking into delectable fragments.

Notes

  • Master Chocolate Melting: Use gentle heat and constant stirring to prevent burning, ensuring a silky smooth texture without scorching.
  • Strategic Cookie Coating: Dip wafers at a three-quarter angle for an elegant, professional-looking finish with minimal chocolate drips.
  • Speedy Decoration Technique: Add embellishments immediately after coating while chocolate remains wet to guarantee perfect adhesion of sprinkles and decorative elements.
  • Chill and Set Smartly: Allow decorated cookies to rest on parchment paper at room temperature or briefly refrigerate to expedite chocolate hardening and maintain crisp design details.
  • Prep Time: 25 minutes
  • Cook Time: 15 minutes
  • Category: Desserts, Snacks
  • Method: Mixing
  • Cuisine: American

Nutrition

  • Serving Size: 13
  • Calories: 220
  • Sugar: 20 g
  • Sodium: 150 mg
  • Fat: 10 g
  • Saturated Fat: 6 g
  • Unsaturated Fat: 4 g
  • Trans Fat: 0 g
  • Carbohydrates: 30 g
  • Fiber: 1 g
  • Protein: 2 g
  • Cholesterol: 5 mg
Jessica Martin

Jessica Martin

Recipe Developer & Food Writer

Expertise

Recipe Development, Food Styling and Photography​, Seasonal and Local Ingredients​, Vegetarian and Vegan Cuisine​, Culinary Education​

Education

Portland Community College

  • Degree: Associate of Applied Science in Culinary Arts
  • Focus: Comprehensive training in culinary techniques, kitchen management, and food safety. Gained hands-on experience in preparing diverse cuisines and understanding flavor profiles

Oregon Culinary Institute

  • Program: Baking and Pastry Certificate
  • Focus: Specialized education in baking fundamentals, pastry arts, and dessert presentation. Emphasized creativity and precision in crafting baked goods.​

Jessica Martin is a talented food writer and recipe creator who specializes in seasonal cooking and approachable home baking. 

Educated at Portland Community College with additional pastry training from Oregon Culinary Institute, Jessica’s culinary journey spans nearly a decade of creating and sharing flavorful recipes. 

Her deep appreciation for local ingredients shapes each of her recipes, making them both accessible and inspiring. At Beard and Bonnet, Jessica uses her cheerful, down-to-earth writing to help readers effortlessly bring new tastes and creative dishes into their daily routines.

Leave a Reply

Your email address will not be published. Required fields are marked *

Recipe rating 5 Stars 4 Stars 3 Stars 2 Stars 1 Star