Sweet & Sassy No-Bake Cherry Recipe for Summer Joy
Summer’s sweetest dessert meets creamy indulgence in this no-bake cherry delight recipe that promises pure bliss with every spoonful.
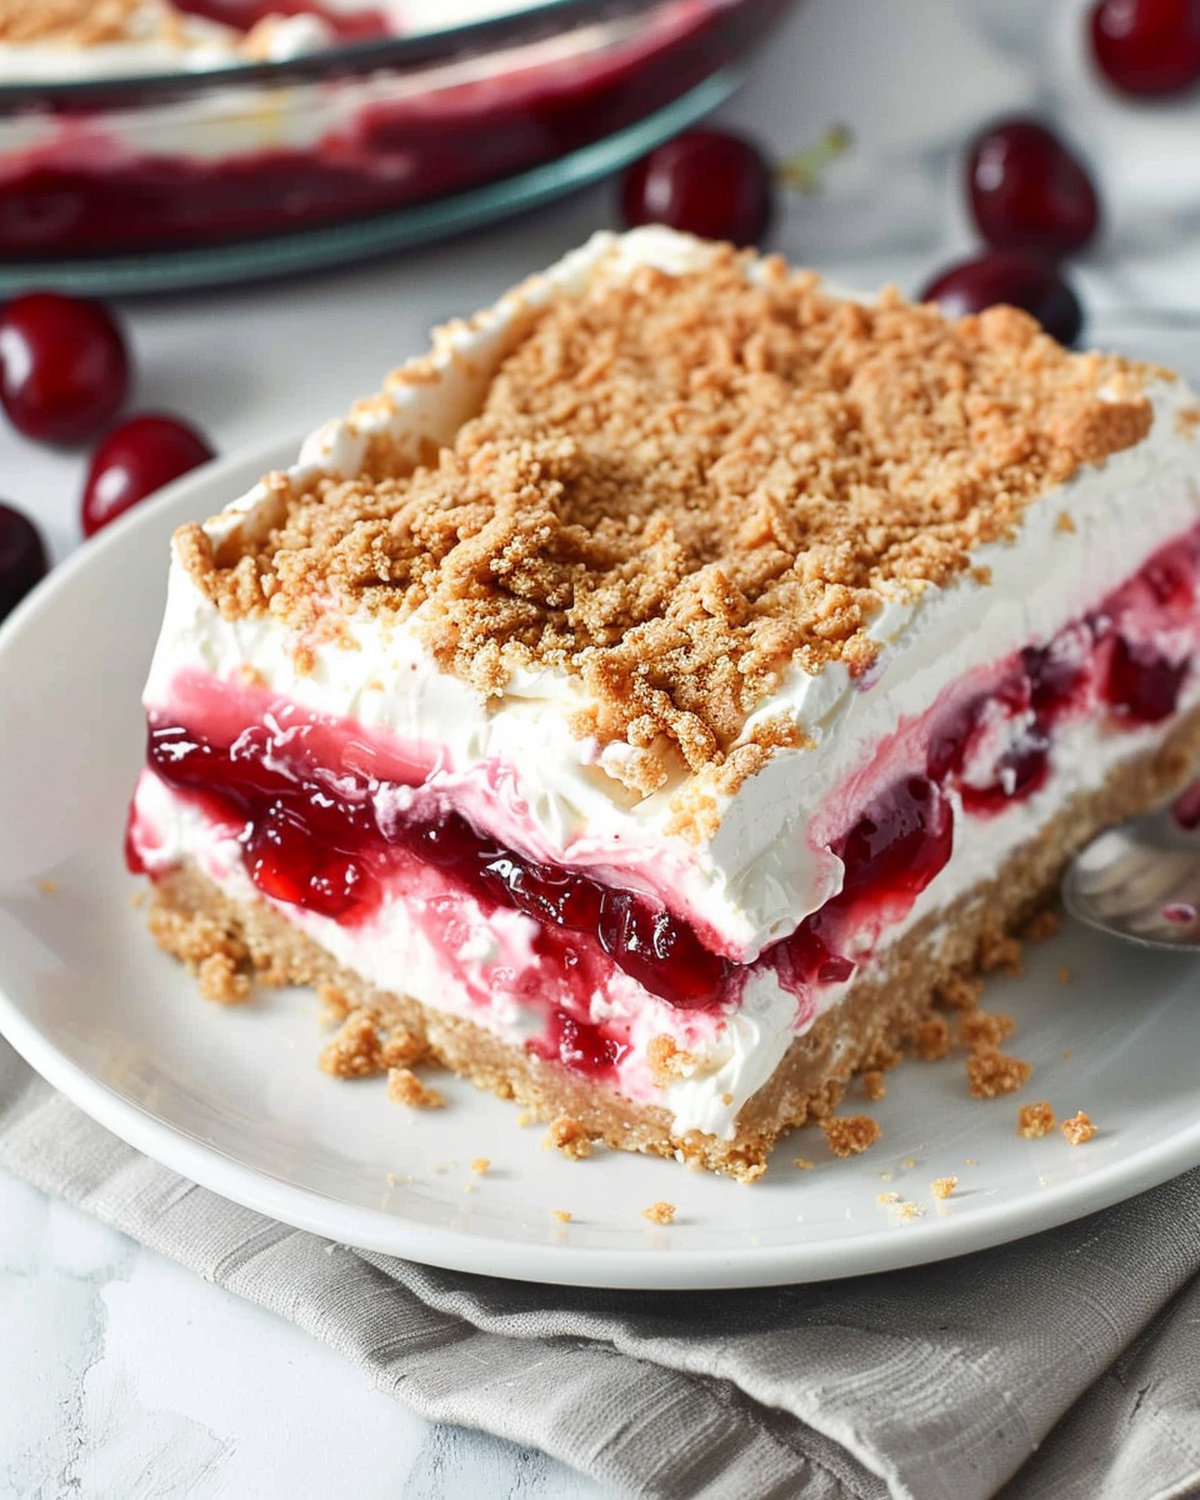
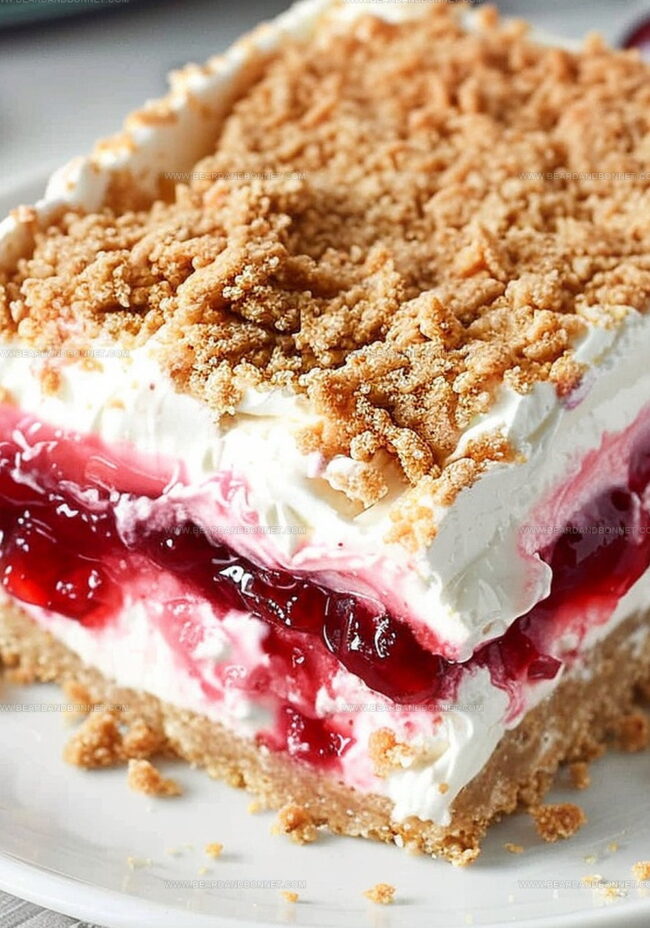
Layers of velvety cream cheese, sweet graham crackers, and luscious cherry topping create a dessert that sings of effortless elegance.
Cool and refreshing, this treat requires zero oven time and minimal preparation.
The smooth, silky texture melts in your mouth, delivering a symphony of flavors that dance between tangy and sweet.
Whipped to perfection and chilled to crisp satisfaction, this dessert stands as a testament to simple yet remarkable culinary magic.
Grab a fork and dive into a dessert that turns ordinary moments into delectable memories.
Quick Recipe Overview

Ingredients for No-Bake Cherry Bliss
For Crust and Topping:For Cream Cheese Filling:For Fruit Layer:No-Bake Cherry Setup Essentials
How to Build a Chilled Cherry Dessert
Crush graham crackers into fine powder using a rolling pin inside a sealed bag. Press crumbs mixed with butter firmly into a baking dish, creating a solid base.
Whip cream cheese with sugar until silky smooth. Create a fluffy cream by whisking heavy cream with vanilla until peaks form. Gently blend these two mixtures, creating a light and airy filling.
Spread half the creamy mixture over the cracker foundation. Pour cherry pie filling across the surface, creating a vibrant fruity layer. Top with remaining cream mixture, ensuring an even distribution.
Dust reserved cracker crumbs across the top, adding a delightful crunch. Place the entire creation in the refrigerator, allowing flavors to meld and texture to set. Wait patiently for at least three hours, giving the dessert time to become wonderfully chilled and firm.
Cherry Layering Tips and Easy Flavor Twists
Serve This No-Bake Treat at Picnics or Holidays
Chill & Store Cherry the Right Way
Print
Dreamy No-Bake Cherry Recipe
- Total Time: 30 minutes
- Yield: 9 1x
Description
Creamy no-bake cherry delight brings classic dessert comfort to summer gatherings. Sweet layers of graham cracker crust, cream cheese filling, and cherry topping create an irresistible treat you’ll want to share with friends and family.
Ingredients
- 1 (21 oz / 595 g) can cherry pie filling
- 8 oz (226 g) cream cheese, softened and at room temperature
- 1 package graham crackers
- 6 tbsps salted butter, melted
- 2 cups (480 ml) heavy whipping cream
- ½ cup (100 g) sugar
- 3 tbsps sugar
- ½ tsp vanilla extract
Instructions
- Crust Preparation: Crush graham crackers into fine crumbs using a rolling pin within a sealed bag, creating a uniform base texture.
- Crust Formation: Mix melted butter with graham cracker crumbs, firmly pressing the mixture into the bottom of a rectangular dish to create a solid foundation.
- Cream Cheese Blend: Whip cream cheese and sugar using an electric mixer until achieving a velvety, homogeneous consistency without any lumps.
- Cream Preparation: Whip heavy cream with vanilla and sugar until forming stable, voluminous peaks that maintain their structure.
- Mixture Integration: Gently fold whipped cream into the cream cheese mixture, preserving the light, airy texture and preventing deflation.
- Layer Assembly: Spread half of the cream cheese mixture evenly over the graham cracker crust, creating a smooth initial layer.
- Cherry Layer: Distribute cherry pie filling uniformly across the cream cheese layer, ensuring complete coverage from edge to edge.
- Final Cream Layer: Top with remaining cream cheese mixture, creating a sleek and even surface.
- Finishing Touch: Sprinkle reserved graham cracker crumbs over the top for added texture and visual appeal.
- Chilling: Refrigerate the dessert for at least three hours, allowing flavors to meld and the structure to set completely.
Notes
- Crumb Crushing Technique: Use a rolling pin inside a sealed bag for ultrafine graham cracker particles, ensuring a consistent and compact crust base.
- Mixing Mastery: Employ an electric mixer to create a silky, lump-free cream cheese blend, guaranteeing a smooth and luxurious texture.
- Whipping Wisdom: Whip heavy cream until billowy peaks form, folding gently into cream cheese mixture to maintain airy structure.
- Chilling Crucial Step: Refrigerate for at least three hours to allow flavors to develop and dessert to set perfectly, creating a firm and delectable consistency.
- Prep Time: 30 minutes
- Cook Time: 0 minutes
- Category: Desserts, Snacks
- Method: Mixing
- Cuisine: American
Nutrition
- Serving Size: 9
- Calories: 366
- Sugar: 25 g
- Sodium: 145 mg
- Fat: 27 g
- Saturated Fat: 16 g
- Unsaturated Fat: 9 g
- Trans Fat: 0 g
- Carbohydrates: 32 g
- Fiber: 1 g
- Protein: 3 g
- Cholesterol: 70 mg
Jessica Martin
Recipe Developer & Food Writer
Expertise
Recipe Development, Food Styling and Photography, Seasonal and Local Ingredients, Vegetarian and Vegan Cuisine, Culinary Education
Education
Portland Community College
Oregon Culinary Institute
Jessica Martin is a talented food writer and recipe creator who specializes in seasonal cooking and approachable home baking.
Educated at Portland Community College with additional pastry training from Oregon Culinary Institute, Jessica’s culinary journey spans nearly a decade of creating and sharing flavorful recipes.
Her deep appreciation for local ingredients shapes each of her recipes, making them both accessible and inspiring. At Beard and Bonnet, Jessica uses her cheerful, down-to-earth writing to help readers effortlessly bring new tastes and creative dishes into their daily routines.