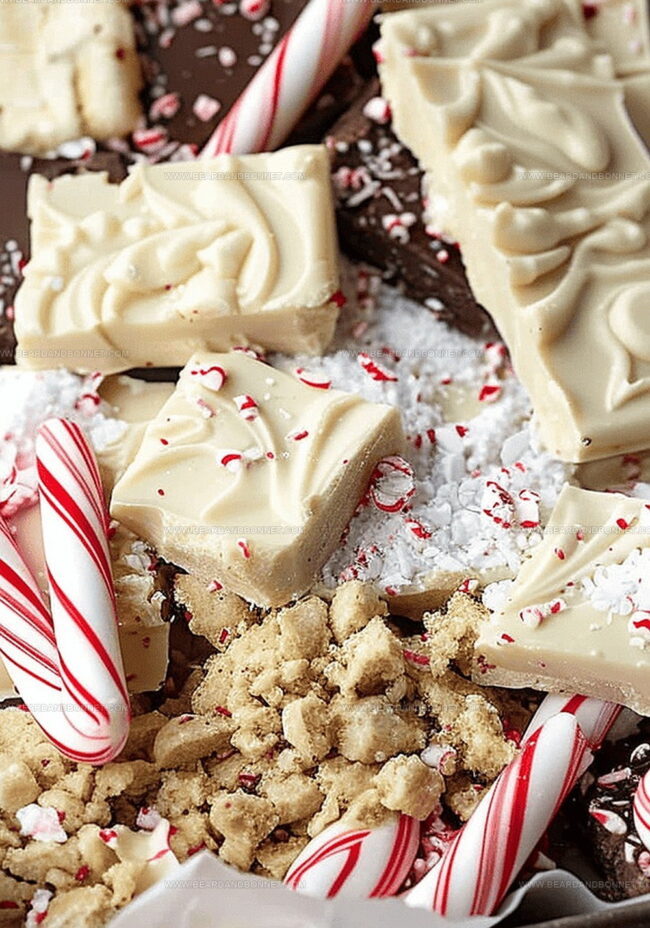
Sweet meets cool in this irresistible peppermint delight bark that melts hearts faster than chocolate.
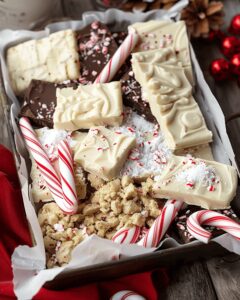
Festive treats rarely come as simple and stunning as this elegant dessert.
Chocolate lovers will swoon over the rich, smooth base layered with crunchy candy cane pieces.
Each delicate shard sparkles with minty freshness and winter charm.
The recipe combines classic holiday flavors in a stunning, no-bake confection that takes mere minutes to create.
Seasonal gatherings demand something special, and this bark delivers pure deliciousness.
Dive into a world of sweet, peppermint-infused magic that will become your new favorite holiday tradition.
Quick Recipe Overview
Prep Time: 15 minutes
Cook Time: 0 minutes
Total Time: 15 minutes
Calories: 208 kcal
Servings: 13
What You’ll Need for Peppermint Bark
For Chocolate Base:
White Chocolate Chips: Creamy foundation that provides smooth, sweet canvas for the bark, choose high-quality chips for best melting and flavor.
Candy Cane Dust: Infuses festive peppermint essence, select fresh candy canes with vibrant red and white colors for intense flavor.
For Texture and Crunch:
Candy Cane Chunks: Adds delightful textural contrast and visual appeal, look for crisp, well-formed candy canes without moisture or sticky residue.
For Preparation:
Parchment Paper: Creates non-stick surface for easy bark removal, ensure paper is smooth and flat for even chocolate spreading.
Handy Gear for Crafting Peppermint Bark
Large Zip-Top Bag: Perfect for crushing candy canes without mess.
Rolling Pin or Meat Mallet: Essential for breaking down candy canes into pieces.
Fine Mesh Strainer: Helps separate candy cane powder from larger chunks.
Large Glass Bowl: Ideal for melting white chocolate smoothly.
Microwave: Quickly and evenly melts chocolate.
Spatula or Spoon: Helps spread chocolate mixture evenly.
Parchment Paper: Creates a non-stick surface for bark preparation.
Separate Small Bowl: Used for collecting candy cane dust.
Simple Steps to Make Peppermint Bark at Home
Peppermint Delight Bark
Candy Cane Preparation Unwrap candy canes and transform them into a delightful crushed mixture using a rolling pin inside a sealed bag. Sift the crushed pieces to separate fine dust from chunky fragments.
Chocolate Melting Zone Gently warm white chocolate chips in a microwave, stirring periodically until smooth and silky. The key is patience and consistent stirring to prevent burning.
Festive Fusion Blend the candy cane dust into the molten chocolate, creating a magical swirling pattern. The mixture will develop a soft pink-white hue with hints of peppermint.
Bark Canvas Smoothly spread the peppermint-infused chocolate onto a parchment-lined surface. Aim for an even, thin layer that promises a delicate crunch.
Decorative Touches Scatter the reserved candy cane chunks across the chocolate surface. Press them gently to ensure they nestle perfectly into the creamy base.
Cooling Transformation Allow the bark to rest at room temperature, letting it transform from liquid to a crisp, breakable treat. Once completely set, break into rustic, irregular pieces that showcase your culinary creativity.
Helpful Peppermint Bark Tips and Flavor Add-Ons
Peppermint Bark Culinary Secrets
Chocolate Melting Magic: Avoid direct heat by using a double boiler or microwave with short intervals to prevent chocolate from burning or seizing. Stir gently and consistently for smooth, glossy results.
Candy Cane Texture Play: Crush candy canes to varying sizes for a delightful mix of fine powder and chunky bits. The powder infuses flavor, while larger pieces add exciting crunch and visual appeal.
Chocolate Quality Matters: Select high-quality white chocolate with a higher cocoa butter content for a richer, creamier bark. Premium chocolate melts more evenly and provides a luxurious taste experience.
Creative Flavor Boosters: Experiment with adding a drop of peppermint extract to intensify the minty flavor. Alternatively, drizzle dark chocolate or sprinkle sea salt for an unexpected flavor twist.
Storage and Gifting Tips: Store bark in an airtight container at room temperature for up to two weeks. Package in festive cellophane bags for charming homemade holiday gifts that everyone will adore.
Serving Peppermint Bark for Any Occasion
Festive Party Platter: Create a stunning holiday dessert board with peppermint bark pieces arranged alongside other seasonal treats like gingerbread cookies, chocolate truffles, and peppermint meringues.
Winter Beverage Companion: Serve bark pieces alongside hot cocoa, coffee, or tea as a delightful complementary sweet that melts beautifully and adds a refreshing peppermint crunch to your warm drink.
Gift-Worthy Packaging: Package bark pieces in clear cellophane bags tied with festive ribbons, making adorable homemade gifts for teachers, neighbors, or holiday party hosts that showcase your culinary creativity.
Dessert Topping Twist: Crumble bark pieces over vanilla ice cream, cheesecake, or chocolate mousse to instantly elevate simple desserts with a festive peppermint crackle and elegant white chocolate base.
How to Keep Peppermint Bark Crunchy and Fresh
Smart Storage Solutions: Wrap individual bark pieces in wax paper or plastic wrap to maintain freshness and prevent sticking.
Chilling Technique: Store the bark in an airtight container in the refrigerator for up to two weeks, keeping its crisp texture and preventing chocolate from melting.
Temperature Tips: Keep bark away from direct sunlight or warm areas to avoid chocolate softening or candy pieces losing their crunch.
Make-Ahead Magic: Prepare the bark up to five days before serving for stress-free entertaining, ensuring maximum flavor and perfect presentation.
Homemade peppermint delight bark combines rich chocolate with cool mint for a festive winter treat. Crisp candy cane pieces add crunch and holiday cheer when sprinkled across melted chocolate layers you’ll savor with each delightful bite.
Ingredients
Scale
24 oz (680 g) white chocolate chips
12 peppermint candy canes
Instructions
Preparation Setup: Line a baking sheet with parchment paper, creating a smooth, clean work surface for crafting the festive chocolate bark.
Candy Cane Transformation: Crush candy canes within a sealed plastic bag using a rolling pin, creating a mix of fine powder and chunky fragments, then sift to separate the dust from larger pieces.
Chocolate Melting Technique: Gently melt white chocolate in a microwave-safe bowl, stirring at short intervals until achieving a silky, fully liquefied state, avoiding overheating.
Flavor Infusion: Whisk the candy cane dust into the molten chocolate, ensuring a thorough and even distribution that creates a uniform peppermint-infused base.
Bark Composition: Pour the peppermint-chocolate mixture onto the prepared parchment, spreading it into a thin, elegant layer using a silicone spatula, then immediately sprinkle the reserved candy cane chunks across the surface, lightly pressing to secure them.
Setting and Serving: Allow the bark to solidify at room temperature until completely firm, then break or cut into irregular pieces, creating a delightful holiday treat with a perfect balance of smooth chocolate and crunchy peppermint.
Notes
Crush Candy Canes Strategically: Use a rolling pin inside a sealed bag for controlled texture, creating both fine powder and chunky pieces for visual and taste variety.
Sieve Separation Technique: Carefully separate candy cane dust from larger fragments to ensure smooth chocolate mixing and attractive topping distribution.
Chocolate Melting Precision: Microwave white chocolate in short bursts, stirring consistently to prevent burning and achieve a perfectly smooth, glossy consistency.
Cooling Considerations: Let bark set naturally at room temperature for optimal texture, avoiding refrigeration to prevent unwanted moisture or chocolate bloom.
Recipe Development, Food Styling and Photography, Seasonal and Local Ingredients, Vegetarian and Vegan Cuisine, Culinary Education
Education
Portland Community College
Degree: Associate of Applied Science in Culinary Arts
Focus: Comprehensive training in culinary techniques, kitchen management, and food safety. Gained hands-on experience in preparing diverse cuisines and understanding flavor profiles
Oregon Culinary Institute
Program: Baking and Pastry Certificate
Focus: Specialized education in baking fundamentals, pastry arts, and dessert presentation. Emphasized creativity and precision in crafting baked goods.
Jessica Martin is a talented food writer and recipe creator who specializes in seasonal cooking and approachable home baking.
Educated at Portland Community College with additional pastry training from Oregon Culinary Institute, Jessica’s culinary journey spans nearly a decade of creating and sharing flavorful recipes.
Her deep appreciation for local ingredients shapes each of her recipes, making them both accessible and inspiring. At Beard and Bonnet, Jessica uses her cheerful, down-to-earth writing to help readers effortlessly bring new tastes and creative dishes into their daily routines.


Jessica Martin
Recipe Developer & Food Writer
Expertise
Recipe Development, Food Styling and Photography, Seasonal and Local Ingredients, Vegetarian and Vegan Cuisine, Culinary Education
Education
Portland Community College
Oregon Culinary Institute
Jessica Martin is a talented food writer and recipe creator who specializes in seasonal cooking and approachable home baking.
Educated at Portland Community College with additional pastry training from Oregon Culinary Institute, Jessica’s culinary journey spans nearly a decade of creating and sharing flavorful recipes.
Her deep appreciation for local ingredients shapes each of her recipes, making them both accessible and inspiring. At Beard and Bonnet, Jessica uses her cheerful, down-to-earth writing to help readers effortlessly bring new tastes and creative dishes into their daily routines.