
Festive Holiday Candy Recipe: Sweet Joy in Minutes
Sweet aromas of nostalgia dance through the kitchen when you whip up this irresistible holiday delight candy recipe that captures childhood memories.
Festive gatherings sparkle with joy when this delectable treat arrives.
Generations have cherished these delightful morsels, passing down their magical recipe.
Every bite holds a whisper of celebration and warmth.
Chocolate and sugar weave together in a symphony of pure indulgence.
Crafted with love, these candies promise to become your newest seasonal tradition.
Dive into this sweet adventure and create moments of pure happiness.
Quick Recipe Overview
What You’ll Need for Holiday Candy
For The Base:For The Caramel Layer:For The Chocolate Topping:Tools to Prep and Package Holiday Candy
Candy Making Steps for Holiday Candy
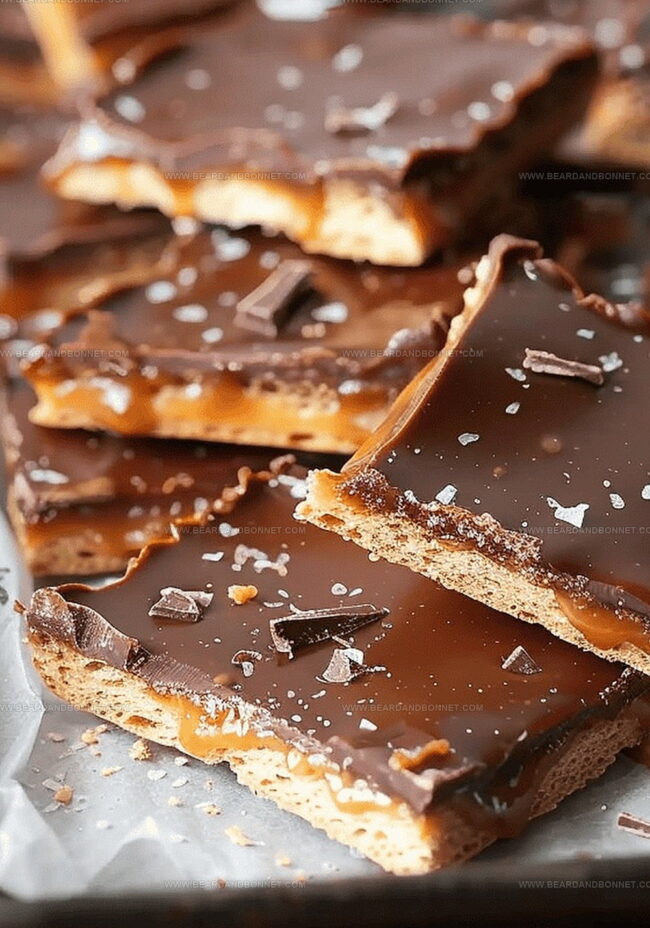
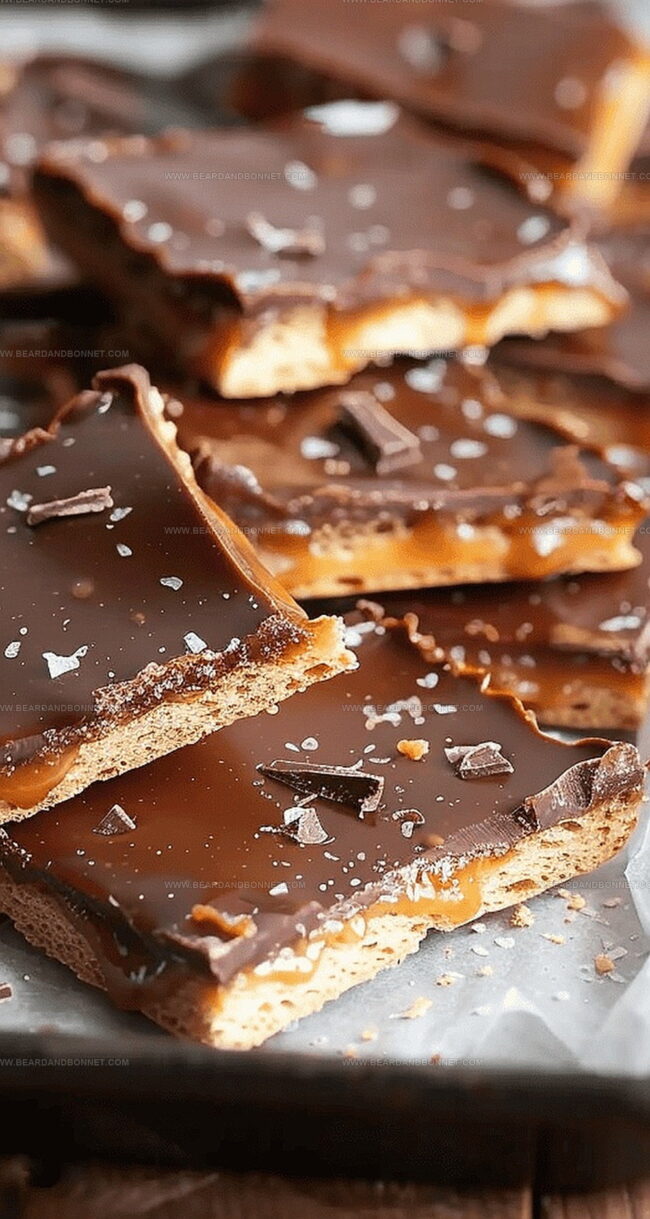
Line a jelly roll pan with nonstick foil, covering edges completely. This creates a smooth surface for easy candy removal.
Create a tight, single layer of saltine crackers across the pan bottom. Each cracker should touch its neighbor without gaps.
Combine brown sugar, butter, and salt in a saucepan. Heat until mixture transforms into a rich, glossy caramel with bubbling edges. Stir in vanilla for extra warmth.
Drizzle molten caramel over cracker base and bake until mixture becomes wonderfully bubbly. Remove from oven and let cool slightly.
Melt chocolate thoroughly, creating a silky blanket to pour over caramel. Spread evenly with gentle sweeping motions.
Allow candy to rest at room temperature, then refrigerate overnight. Slice into delightful bite-sized pieces when completely set.
Tips for Sweetness and Crunch Balance
Serving Holiday Candy at Events or as Gifts
Storing Holiday Candy Without Melting
Print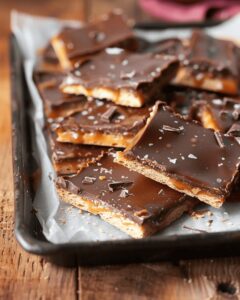
Sweet Holiday Candy Recipe
- Total Time: 20 minutes
- Yield: 13 1x
Description
Festive candy cane truffles blend rich chocolate with peppermint’s cool essence. Smooth ganache and crushed candy canes create a luxurious winter treat you’ll savor with pure holiday joy.
Ingredients
- 1 cup / 225 g / 2 sticks unsalted butter
- 2 cups / 10-12 oz chopped good-quality semi-sweet chocolate
- 1 cup / 220 g firmly packed dark brown sugar
- 28–35 saltine crackers (about one sleeve)
- 1 tsp vanilla extract
- ¼ tsp kosher salt
Instructions
- Preparation: Position oven rack centrally and preheat to 400°F (204°C). Line a 10×15-inch jelly roll pan with aluminum foil, ensuring complete coverage and creating a non-stick surface.
- Cracker Base: Meticulously arrange saltine crackers in an uninterrupted, precise layer across the pan’s bottom, eliminating any spacing between crackers.
- Caramel Creation: In a medium saucepan, combine dark brown sugar, unsalted butter, and kosher salt over medium heat. Stir consistently until the mixture transforms into a smooth, bubbling liquid. Briefly boil to dissolve sugar completely, then swiftly incorporate vanilla extract and remove from heat.
- Baking and Chocolate Layer: Pour caramel evenly over cracker base, transfer to preheated oven, and bake for 5 minutes until caramel vigorously bubbles. Simultaneously, melt chocolate in microwave using 30-second intervals, stirring between each burst until achieving a completely smooth consistency.
- Finishing and Setting: Once base slightly cools, spread liquefied chocolate across caramel layer using a spatula to create a flawless, even coating. Allow confection to settle at room temperature, then refrigerate overnight. After complete solidification, carefully extract candy slab, remove foil, and slice into elegant, bite-sized pieces.
Notes
- Cracker Placement Precision: Arrange saltines tightly without gaps to create a sturdy, uniform base that ensures even caramel coverage and a consistent texture.
- Caramel Cooking Technique: Watch closely during sugar and butter melting; consistent stirring prevents burning and guarantees a smooth, glossy caramel sauce with perfect consistency.
- Chocolate Melting Strategy: Use short microwave intervals and stir between each to prevent chocolate scorching, ensuring a silky, glossy chocolate layer without burning.
- Cooling and Setting Secrets: Refrigerate overnight for complete solidification, allowing flavors to meld and creating a crisp, clean break when cutting into pieces.
- Prep Time: 15 minutes
- Cook Time: 5 minutes
- Category: Snacks, Desserts
- Method: Baking
- Cuisine: American
Nutrition
- Serving Size: 13
- Calories: 204
- Sugar: 12 g
- Sodium: 73 mg
- Fat: 13 g
- Saturated Fat: 8 g
- Unsaturated Fat: 5 g
- Trans Fat: 0 g
- Carbohydrates: 24 g
- Fiber: 1 g
- Protein: 1 g
- Cholesterol: 31 mg
Jessica Martin
Recipe Developer & Food Writer
Expertise
Recipe Development, Food Styling and Photography, Seasonal and Local Ingredients, Vegetarian and Vegan Cuisine, Culinary Education
Education
Portland Community College
Oregon Culinary Institute
Jessica Martin is a talented food writer and recipe creator who specializes in seasonal cooking and approachable home baking.
Educated at Portland Community College with additional pastry training from Oregon Culinary Institute, Jessica’s culinary journey spans nearly a decade of creating and sharing flavorful recipes.
Her deep appreciation for local ingredients shapes each of her recipes, making them both accessible and inspiring. At Beard and Bonnet, Jessica uses her cheerful, down-to-earth writing to help readers effortlessly bring new tastes and creative dishes into their daily routines.