Oven Preparation Warm the kitchen with a toasty 375-degree environment and ready a smooth baking surface with gentle grease and parchment paper protection.
Egg White Clouds Whip egg whites into fluffy peaks, gradually adding sugar until they transform into glossy, cloud-like mountains of sweetness. In a separate bowl, blend egg yolks and vanilla into a creamy golden mixture.
Chocolate Magic Gently combine flour, cocoa, and other dry companions into a silky chocolate landscape. Softly fold the rich chocolate mixture into the egg white clouds, creating a delicate, airy batter.
Baking Adventure Spread the batter across the prepared pan with loving care. Bake until the surface bounces back with a gentle touch, around 14-16 minutes of transformative heat.
Rolling Technique Carefully transfer the warm cake onto a flat surface. Gently roll from a short end, keeping the parchment paper snug against the delicate layers. Allow the cake to cool and rest, developing its signature elegant curve.
Smart Swaps for Peppermint Chocolate Roll Cake
Egg White Magic: Achieve perfect meringue by ensuring your bowl and beaters are completely grease-free. Room temperature eggs whip up more smoothly and create higher peaks.
Cocoa Powder Power: Use high-quality Dutch-processed cocoa for a deeper, richer chocolate flavor. Sift the cocoa to prevent lumps and ensure smooth batter consistency.
Roll with Confidence: When rolling the cake while warm, use a clean kitchen towel dusted with powdered sugar to prevent sticking. Roll gently but firmly to create a tight, even spiral.
Flavor Twist: Experiment with different extract variations like orange, almond, or raspberry to create unique flavor combinations. Swap peppermint extract for a completely different taste profile.
Make-Ahead Marvel: This cake can be prepared a day in advance and stored tightly wrapped in the refrigerator. The flavors actually develop and intensify overnight, making it perfect for advance party planning.
How to Serve Peppermint Roll Cake
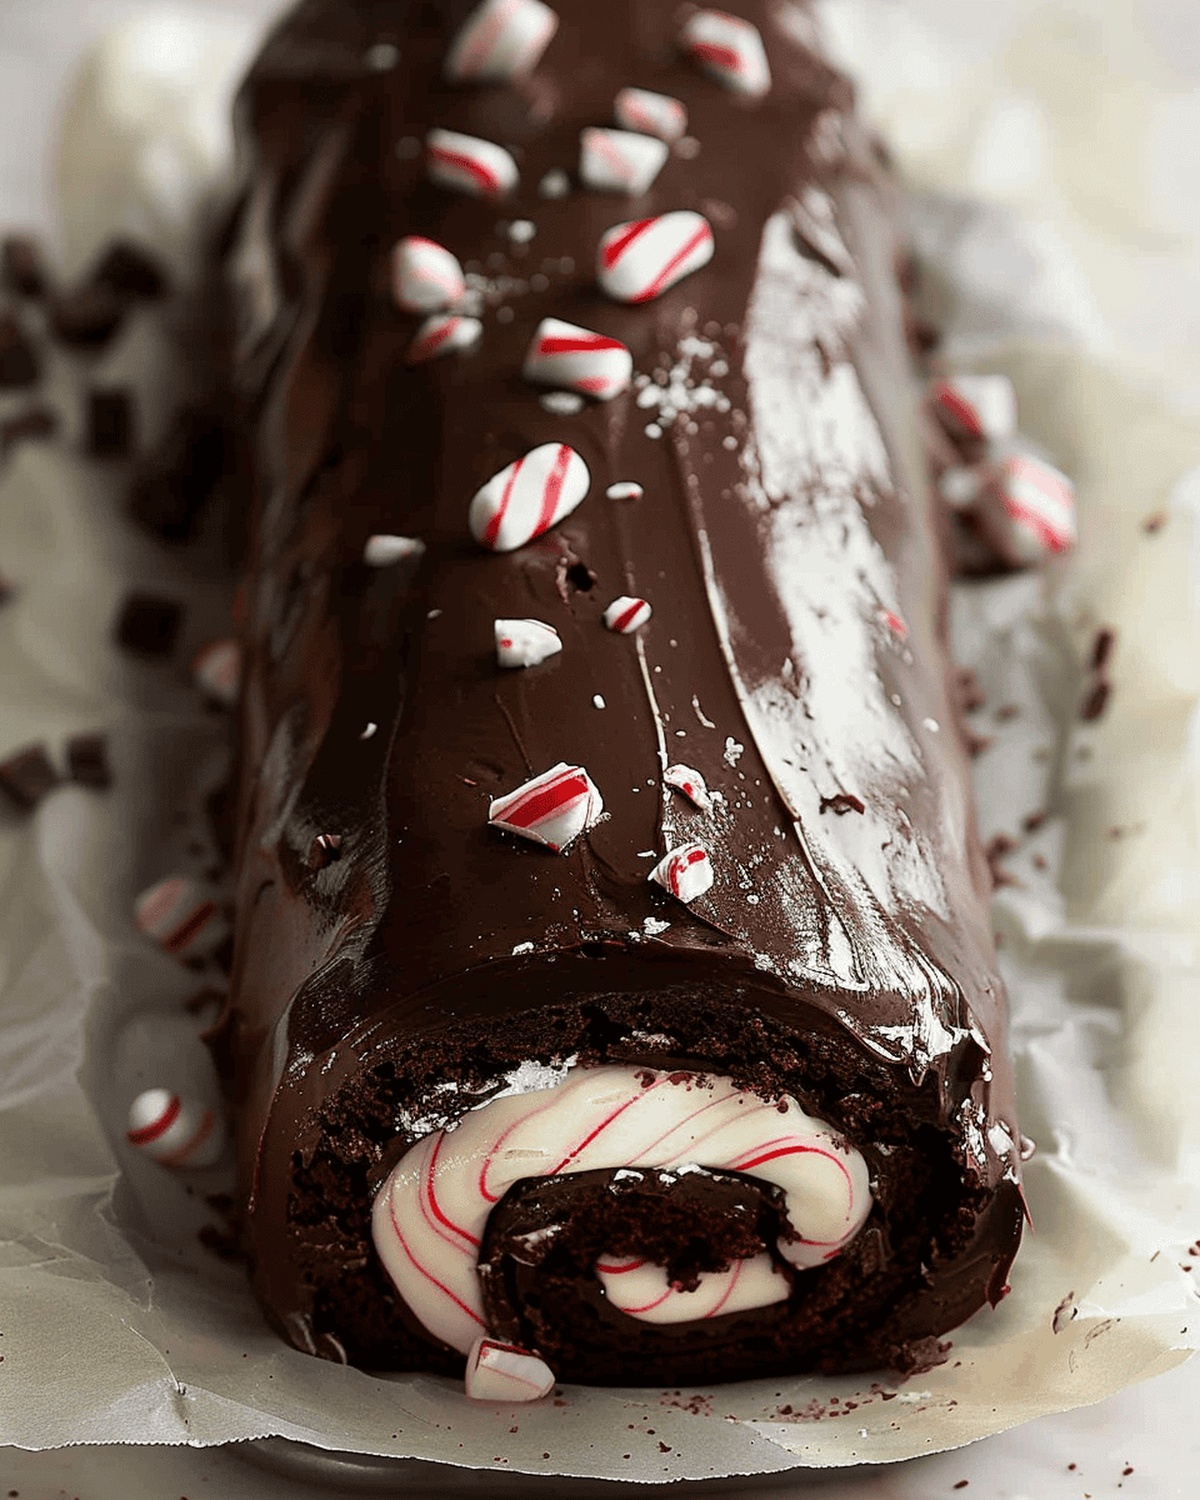
Festive Holiday Centerpiece: Transform this decadent roll cake into a show-stopping dessert by garnishing with candy cane pieces, fresh mint leaves, and a light dusting of powdered sugar for a stunning holiday presentation.
Peppermint Chocolate Flavor Boost: Enhance the cake’s taste by brushing the inside with peppermint schnapps or adding a thin layer of peppermint extract mixed with melted chocolate before rolling for an extra minty kick.
Elegant Dessert Plating: Slice the roll cake into delicate rounds and arrange on a white porcelain plate. Drizzle with warm chocolate ganache and sprinkle crushed peppermint candies around the edges for a professional restaurant-style presentation that will impress your guests.
Decadent Ice Cream Pairing: Serve chilled slices alongside a scoop of vanilla bean or peppermint ice cream, creating a luxurious dessert experience that balances the rich chocolate and cool mint flavors perfectly.
Keeping Peppermint Chocolate Roll Cake Fresh
Smart Refrigeration Strategy: Keep the cake roll wrapped tightly in plastic wrap inside an airtight container to maintain moisture and prevent flavor absorption from other foods. Store in the refrigerator for up to 3-4 days for maximum freshness.
Freezing Magic: Slice the cake roll into individual portions, wrap each securely in plastic wrap, then place inside a freezer-safe container. Frozen cake sections stay delicious for 2-3 months and can be thawed at room temperature for quick dessert enjoyment.
Make-Ahead Magic: Prepare the cake roll one day before serving to allow flavors to blend and texture to soften. The peppermint chocolate combination develops more depth when resting overnight in the refrigerator.
Serving Temperature Trick: Remove the cake roll from refrigeration 15-20 minutes before serving to let it reach room temperature. This gentle warming enhances the chocolate’s richness and helps the filling become wonderfully creamy and smooth.
Peppermint chocolate dream roll cake delights winter dessert enthusiasts with its elegant chocolate spirals and cool mint cream. Delicate layers meld rich cocoa and refreshing peppermint, promising festive indulgence you will savor until the last crumb.
Ingredients
Scale
4 large eggs, yolks and whites separated
½ cup (118 ml/4 fl oz) white sugar
⅓ cup (79 ml/2.7 fl oz) white sugar
½ cup (60 g/2.1 oz) all-purpose flour
⅓ cup (33 g/1.2 oz) unsweetened cocoa powder
½ tsp baking powder
¼ tsp baking soda
1/8 tsp salt
⅓ cup (79 ml/2.7 fl oz) water
8 oz (226 g) cream cheese
¼ cup (57 g/2 oz) butter
1 cup (120 g/4.2 oz) icing sugar
½ cup (118 ml/4 fl oz) heavy cream
1 cup (170 g/6 oz) semi-sweet chocolate chips
20 starlight mint candies, crushed
1 tsp vanilla essence
½ tsp peppermint essence
Crushed starlight mint candies for garnish
Instructions
Preparation: Ignite the oven to 375°F. Lavishly grease a 15 x 10-inch jelly-roll pan, layer with parchment paper, then re-grease and dust with flour to guarantee seamless cake extraction.
Egg Transformation: Whip egg whites to soft peaks, gradually blending in sugar until glossy and rigid. In a parallel bowl, vigorously beat egg yolks and vanilla for three minutes, progressively integrating remaining sugar to create a velvety emulsion.
Dry Ingredient Fusion: Sift flour, cocoa, baking powder, baking soda, and salt. Incorporate water into the yolk mixture on low speed, achieving a silken consistency.
Batter Harmony: Tenderly fold chocolate mixture into whipped egg whites, maintaining an ethereal, uniform texture without compromising volume.
Baking Ritual: Spread batter evenly across the pan. Bake 14-16 minutes until the surface rebounds elastically when touched, signaling perfect culinary execution.
Cooling Choreography: Immediately transfer cake-with-parchment to a heat-safe surface. Roll from a short end, preserving parchment. Cool completely on a wire rack, then refrigerate 30 minutes to stabilize the delicate structure.
Notes
Precise Pan Preparation: Grease and flour the pan meticulously to prevent cake sticking and ensure easy release.
Egg White Whipping Technique: Whip egg whites to stiff peaks slowly, adding sugar gradually for maximum volume and stability.
Gentle Folding Method: Incorporate chocolate mixture into egg whites with a light touch to preserve the cake’s airy texture and prevent deflation.
Cooling and Rolling Tip: Roll the cake while still warm with parchment paper to create a perfect spiral shape and prevent cracking.
Recipe Development, Food Styling and Photography, Seasonal and Local Ingredients, Vegetarian and Vegan Cuisine, Culinary Education
Education
Portland Community College
Degree: Associate of Applied Science in Culinary Arts
Focus: Comprehensive training in culinary techniques, kitchen management, and food safety. Gained hands-on experience in preparing diverse cuisines and understanding flavor profiles
Oregon Culinary Institute
Program: Baking and Pastry Certificate
Focus: Specialized education in baking fundamentals, pastry arts, and dessert presentation. Emphasized creativity and precision in crafting baked goods.
Jessica Martin is a talented food writer and recipe creator who specializes in seasonal cooking and approachable home baking.
Educated at Portland Community College with additional pastry training from Oregon Culinary Institute, Jessica’s culinary journey spans nearly a decade of creating and sharing flavorful recipes.
Her deep appreciation for local ingredients shapes each of her recipes, making them both accessible and inspiring. At Beard and Bonnet, Jessica uses her cheerful, down-to-earth writing to help readers effortlessly bring new tastes and creative dishes into their daily routines.

Jessica Martin
Recipe Developer & Food Writer
Expertise
Recipe Development, Food Styling and Photography, Seasonal and Local Ingredients, Vegetarian and Vegan Cuisine, Culinary Education
Education
Portland Community College
Oregon Culinary Institute
Jessica Martin is a talented food writer and recipe creator who specializes in seasonal cooking and approachable home baking.
Educated at Portland Community College with additional pastry training from Oregon Culinary Institute, Jessica’s culinary journey spans nearly a decade of creating and sharing flavorful recipes.
Her deep appreciation for local ingredients shapes each of her recipes, making them both accessible and inspiring. At Beard and Bonnet, Jessica uses her cheerful, down-to-earth writing to help readers effortlessly bring new tastes and creative dishes into their daily routines.