Savory Cheeseburger Spring Rolls Recipe

Quick Twist: Whip Up Cheeseburger Spring Rolls Recipe

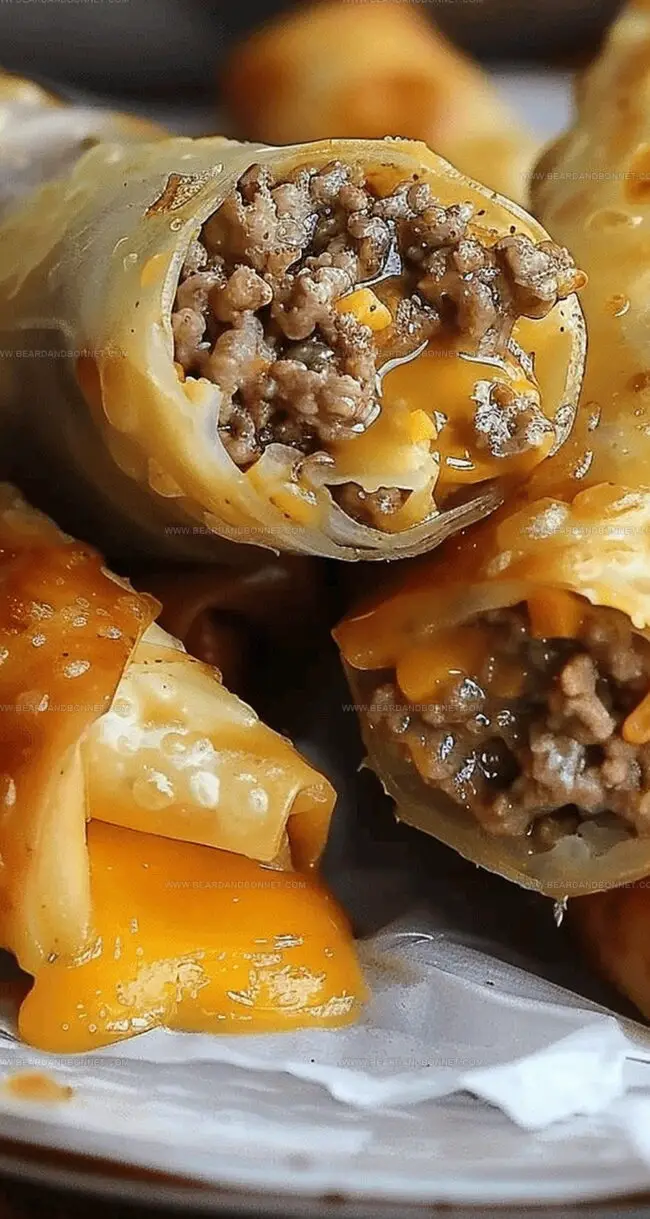
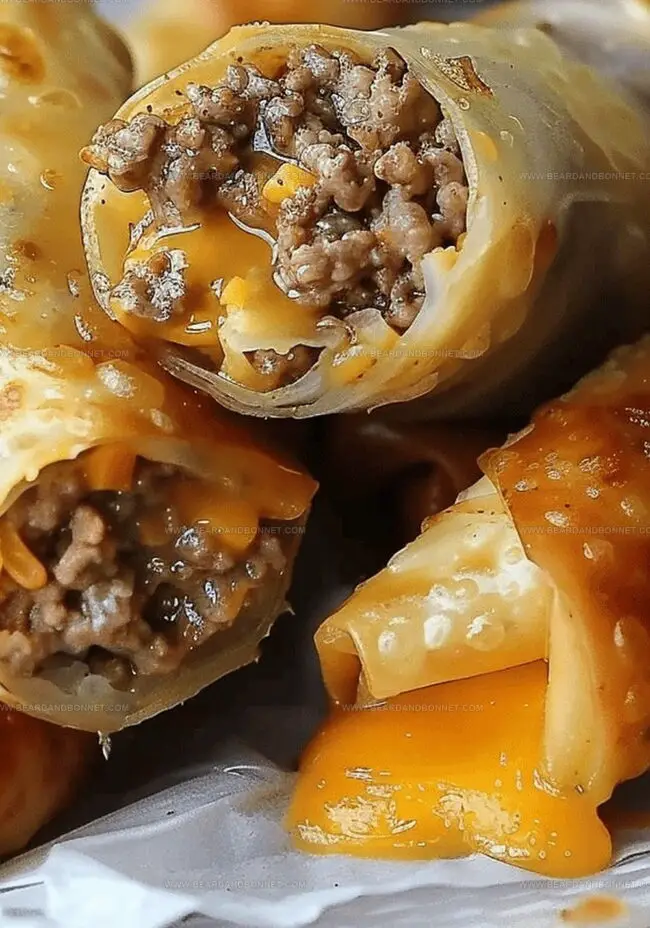
Crispy golden edges and a molten cheese center make these cheeseburger spring rolls a mouthwatering fusion of American and Asian flavors.

The unexpected combination delivers a delightful crunch that surprises with every bite.

Juicy ground beef nestles inside a delicate wrapper, promising a burst of savory goodness.

Melted cheese creates a luxurious interior that complements the crisp exterior perfectly.

These rolls bring a playful twist to traditional appetizers, blending familiar burger elements with the elegance of spring rolls.

Packed with bold flavors and easy to make, this recipe transforms ordinary ingredients into an extraordinary snack.

Dive into this delectable creation that will surely impress at any gathering.

Quick Recipe Overview

Prep Time: 25 minutes

Cook Time: 20 minutes

Total Time: 45 minutes

Calories: 328 kcal

Servings: 5

Cheeseburger Spring Rolls Ingredient Guide

For Filling Base:
  • Ground Beef: Provides hearty protein base with rich, meaty flavor, selecting lean cut ensures less greasiness.
  • Onions: Adds subtle sweetness and depth, choose fresh firm onions for crisp texture.
  • Garlic: Delivers robust aromatic punch, fresh cloves preferred over pre-minced for intense flavor.
For Seasoning Blend:
  • Ketchup: Introduces tangy sweetness, balances meat's richness.
  • Worcestershire Sauce: Enhances umami complexity, adds subtle fermented depth.
  • Garlic Powder, Onion Powder: Amplifies savory undertones, ensures consistent flavor distribution.
  • Smoked Paprika: Contributes smoky warmth, elevates overall taste profile.
  • Salt, Black Pepper: Fundamental flavor enhancers, adjust according to personal preference.
For Wrapping and Finishing:
  • Spring Roll Wrappers: Creates crispy exterior, ensures tight seal for fillings.
  • Cheddar Cheese: Melts beautifully, adds creamy richness.
  • Olive Oil: Provides smooth sautéing medium, imparts light flavor.
  • Frying Oil: Enables golden crispy exterior, ensures even cooking.

Kitchen Tools for Cheeseburger Spring Rolls

  • Large skillet: Perfect for sautéing onions and cooking ground beef.
  • Wooden spoon or spatula: Essential for stirring and breaking up beef while cooking.
  • Mixing bowl: Needed to combine beef and cheese mixture.
  • Cutting board: Use for chopping onions and preparing ingredients.
  • Sharp knife: Required for dicing onions and mincing garlic.
  • Tongs: Helpful for turning spring rolls while frying.
  • Napkin-lined plate: Great for draining excess oil after frying.
  • Clean surface: Necessary for wrapping spring rolls.
  • Small bowl of water: Used for sealing spring roll wrappers.
  • Deep frying pan or skillet: Ideal for crispy golden frying.

Rolling and Frying Cheeseburger Spring Rolls Easily

  • Flavor Foundation

Sizzle onions and garlic in a skillet until they become soft and aromatic, creating a delicious base for the filling.

  • Beef Transformation

Brown ground beef thoroughly, breaking it into small crumbles that will blend perfectly with other ingredients.

  • Seasoning Magic

Introduce a mix of zesty condiments and spices to elevate the beef’s flavor profile, creating a taste explosion.

  • Cheesy Fusion

Gently fold shredded cheddar into the cooled beef mixture, allowing the cheese to mingle and create creamy pockets of deliciousness.

  • Rolling Technique

Carefully wrap the savory filling inside delicate spring roll wrappers, ensuring each roll is sealed tight and compact.

  • Crispy Perfection

Fry the rolls in hot oil, transforming them into golden-brown delights with a satisfying crunch that will make mouths water.

  • Serving Sensation

Let the spring rolls rest on absorbent paper, then plate them as an irresistible appetizer that promises to impress every guest.

Flavor Additions for Cheeseburger Filling

  • Crispy Cheese Lover's Hack: Add extra sharp cheddar or pepper jack for a bold flavor punch that elevates the classic cheeseburger taste.
  • Prep-Ahead Magic: These spring rolls can be assembled up to 24 hours in advance and stored in the refrigerator before frying, making party planning a breeze.
  • Dipping Sauce Delight: Create quick burger-inspired dips like spicy ketchup, tangy mustard sauce, or creamy ranch to complement the crispy rolls perfectly.
  • Lean Meat Option: Swap ground beef with ground turkey or plant-based crumbles for a lighter protein alternative that still delivers incredible flavor.
  • Freezer-Friendly Trick: Once assembled and before frying, these spring rolls can be frozen for up to one month, providing a convenient make-ahead appetizer for unexpected guests or quick meals.

Plating Cheeseburger Spring Rolls with Dips

  • Diner-Style Dipping Adventure: Create a nostalgic cheeseburger experience by serving these spring rolls with classic burger condiments like ketchup, mustard, and a zesty homemade special sauce for extra flavor explosion.
  • Burger-Inspired Platter Presentation: Arrange the crispy spring rolls on a wooden board with small dipping bowls, garnish with fresh lettuce leaves, pickle slices, and cherry tomatoes to mimic a deconstructed cheeseburger aesthetic.
  • Party Crowd Pleaser Setup: Serve these appetizers at game nights or gatherings with cold beer, create a casual buffet-style spread where guests can grab and enjoy the crispy, cheesy rolls with minimal fuss and maximum enjoyment.
  • Picnic Perfect Finger Food: Pack these spring rolls in a sealed container for outdoor meals, pair with a simple coleslaw or potato salad for a portable, delicious lunch or snack that brings classic burger flavors into a fun, handheld format.

How to Store and Reheat Cheeseburger Spring Rolls

  • Smart Storage Solutions: Keep leftover spring rolls in an airtight container inside the refrigerator for up to 3 days. Carefully stack rolls with parchment paper between layers to prevent sticking.
  • Quick Reheating Hack: Revive crispy texture by warming spring rolls in an air fryer at 375°F for 3-4 minutes. Oven method works well too – bake at 350°F for 5-6 minutes until heated through and crunchy.
  • Freezer-Friendly Option: Uncooked rolled spring rolls can be frozen flat on a baking sheet, then transferred to freezer bags. Store frozen rolls up to 2 months. Thaw in refrigerator before frying for best results.
  • Advance Prep Trick: Prepare beef and cheese filling one day ahead, storing covered in the refrigerator. This helps develop richer flavors and makes assembly faster when you're ready to cook.
Print
clock clock iconcutlery cutlery iconflag flag iconfolder folder iconinstagram instagram iconpinterest pinterest iconfacebook facebook iconprint print iconsquares squares iconheart heart iconheart solid heart solid icon
Savory Cheeseburger Spring Rolls Recipe

Crispy Cheeseburger Spring Rolls


5 Stars 4 Stars 3 Stars 2 Stars 1 Star

4.5 from 8 reviews

  • Total Time: 45 minutes
  • Yield: 5 1x

Description

Savory cheeseburger spring rolls merge classic American flavors with crispy Asian wrappers. Melted cheese, ground beef, and zesty seasonings create an irresistible fusion you’ll crave.


Ingredients

Scale
  • 1 lb (1 pound) ground beef
  • 1 package spring roll wrappers
  • 1 cup shredded cheddar cheese
  • 1 small onion, diced
  • 2 garlic cloves, minced
  • 2 tbsps olive oil
  • 1 tbsp Worcestershire sauce
  • 1 tbsp ketchup
  • ½ tsp garlic powder
  • ¼ tsp onion powder
  • ¼ tsp smoked paprika
  • Salt and pepper to taste

Instructions

  1. Sauté Aromatics: Heat olive oil in a skillet and gently sauté diced onions with minced garlic until softened and fragrant.
  2. Brown Beef: Add ground beef to the skillet, breaking it into fine crumbles and cooking thoroughly until completely browned with no pink remaining.
  3. Season Mixture: Infuse the meat with ketchup, Worcestershire sauce, garlic powder, onion powder, smoked paprika, salt, and pepper, creating a robust flavor foundation.
  4. Prepare Filling: Combine the seasoned beef with shredded cheddar cheese, allowing residual heat to slightly melt the cheese and create a harmonious filling.
  5. Assemble Rolls: Lay spring roll wrappers flat, moisten edges with water, spoon beef and cheese mixture near one corner, then tightly roll and seal the edges to form compact parcels.
  6. Fry to Perfection: Heat oil in a skillet and carefully fry spring rolls, rotating to achieve an even, golden-brown crispy exterior on all sides.
  7. Serve and Enjoy: Drain spring rolls on paper towels to remove excess oil, then plate and serve immediately, presenting a crispy, handheld cheeseburger-inspired delight.

Notes

  • Meat Preparation Tip: Drain excess fat after browning beef to prevent soggy spring rolls and ensure a crisp, light texture.
  • Wrapper Sealing Technique: Use water or egg wash along wrapper edges to create a tight seal that prevents filling from leaking during frying.
  • Oil Temperature Control: Maintain consistent medium-high heat around 350-375°F for perfectly golden, crispy spring rolls without burning.
  • Serve Fresh and Hot: Consume immediately after cooking to enjoy maximum crispiness and prevent wrappers from becoming soft and losing their delightful crunch.
  • Prep Time: 25 minutes
  • Cook Time: 20 minutes
  • Category: Lunch, Appetizer, Snacks
  • Method: Frying
  • Cuisine: Fusion

Nutrition

  • Serving Size: 5
  • Calories: 328
  • Sugar: 1 g
  • Sodium: 576 mg
  • Fat: 20 g
  • Saturated Fat: 8 g
  • Unsaturated Fat: 10 g
  • Trans Fat: 0 g
  • Carbohydrates: 22 g
  • Fiber: 1 g
  • Protein: 16 g
  • Cholesterol: 58 mg
Jessica Martin

Jessica Martin

Recipe Developer & Food Writer

Expertise

Recipe Development, Food Styling and Photography​, Seasonal and Local Ingredients​, Vegetarian and Vegan Cuisine​, Culinary Education​

Education

Portland Community College

  • Degree: Associate of Applied Science in Culinary Arts
  • Focus: Comprehensive training in culinary techniques, kitchen management, and food safety. Gained hands-on experience in preparing diverse cuisines and understanding flavor profiles

Oregon Culinary Institute

  • Program: Baking and Pastry Certificate
  • Focus: Specialized education in baking fundamentals, pastry arts, and dessert presentation. Emphasized creativity and precision in crafting baked goods.​

Jessica Martin is a talented food writer and recipe creator who specializes in seasonal cooking and approachable home baking. 

Educated at Portland Community College with additional pastry training from Oregon Culinary Institute, Jessica’s culinary journey spans nearly a decade of creating and sharing flavorful recipes. 

Her deep appreciation for local ingredients shapes each of her recipes, making them both accessible and inspiring. At Beard and Bonnet, Jessica uses her cheerful, down-to-earth writing to help readers effortlessly bring new tastes and creative dishes into their daily routines.

Leave a Reply

Your email address will not be published. Required fields are marked *

Recipe rating 5 Stars 4 Stars 3 Stars 2 Stars 1 Star