
Homemade Sweet & Crunchy Maple Nut Granola Recipe Magic
Mornings shine brighter with this soul-warming maple nut granola that blends rich, toasty flavors and irresistible crunch.
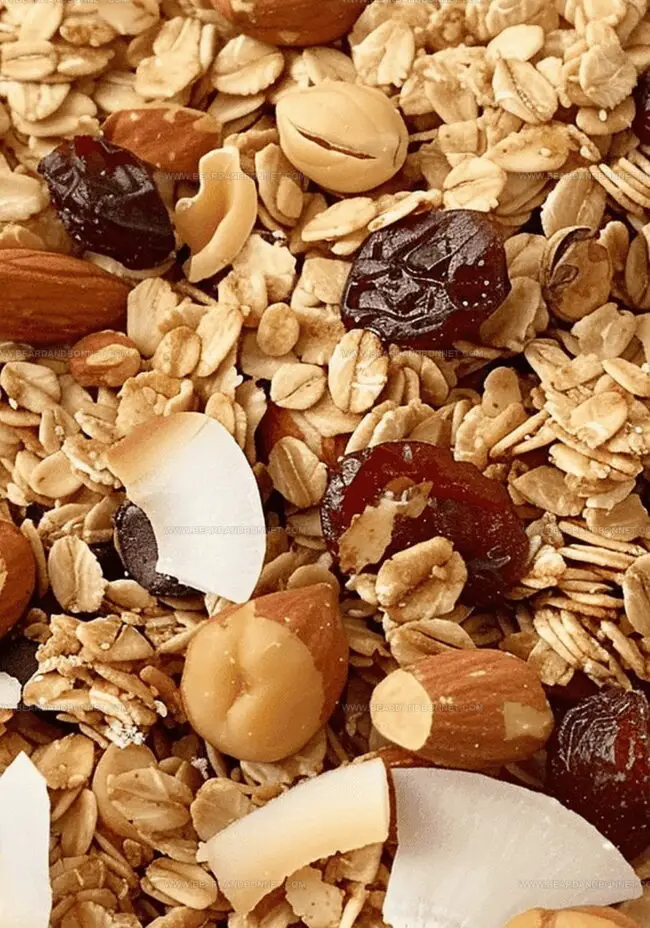
Hearty oats mingle with maple syrup in a delectable dance of sweetness and texture.
Each golden, crisp cluster carries a robust blend of nuts that adds depth and warmth to every bite.
Drizzled with pure maple syrup and baked to perfection, this granola transforms ordinary breakfast moments into delightful experiences.
Nuts provide a satisfying crackle and nutty essence that elevates the entire recipe.
The recipe offers a wholesome, homemade alternative to store-bought versions that will fill your kitchen with an inviting aroma.
Enjoy this granola sprinkled over yogurt, mixed into smoothie bowls, or savored straight from the jar for a quick, energizing snack.
Quick Recipe Overview
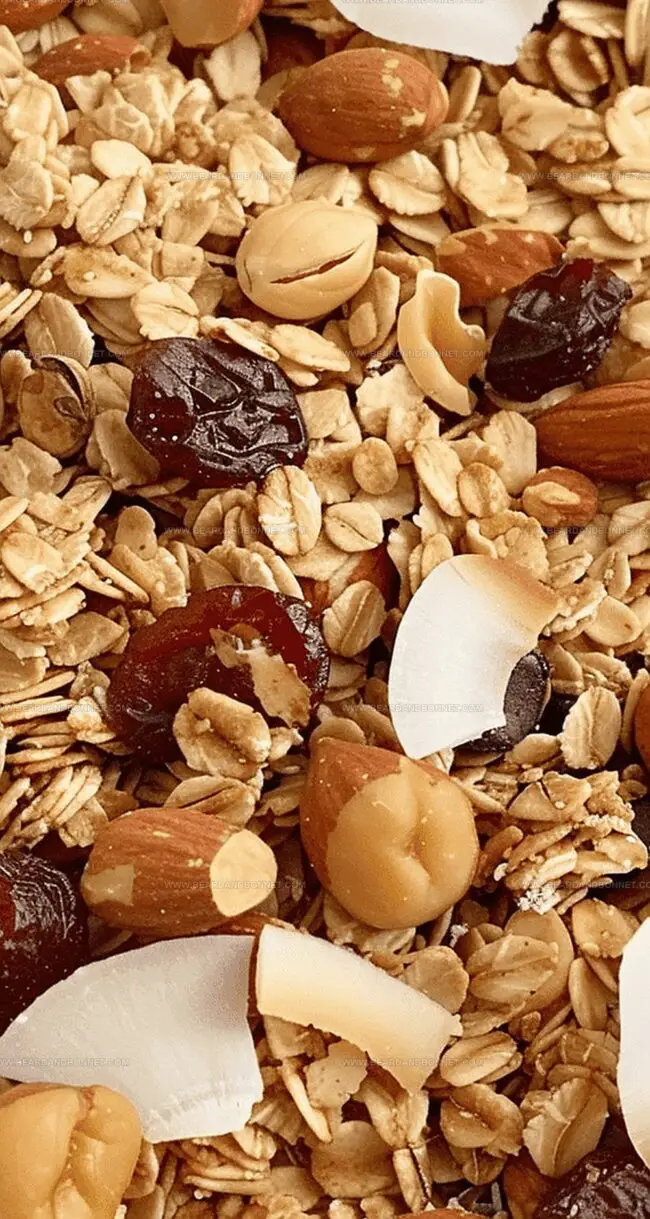
Crunchy Maple Nut Granola Ingredient Breakdown
For Base and Crunch:For Binding and Sweetening:For Flavor and Nutrition Boost:What You’ll Need for Maple Nut Granola
Steps to Make Crunchy Maple Granola at Home
Warm the oven to a cozy 325 degrees. Grab a baking sheet and give it a light oil massage to prevent sticky situations.
In a roomy bowl, tumble together oats, nuts, maple syrup, coconut oil, shredded coconut, vanilla, cinnamon, and salt. Swirl everything until it’s beautifully blended and glistening.
Spread the mixture across the baking sheet like a delicious landscape. Pop it into the warm oven for a 30-minute transformation.
After 10 minutes, rescue the sheet and give the granola a good shuffle. This dance helps create those irresistible crunchy clusters. Return to the oven.
At the 20-minute mark, stir again and gently press down. This is where magic happens – encouraging those nutty bits to cuddle up together.
Let the granola bake until it reaches a golden, crispy perfection. The kitchen will smell like heaven.
Once out of the oven, let the granola cool completely. Sprinkle in dried cranberries and chia seeds for a final flavor burst.
Tips for Better Texture in Maple Granola
Serving Maple Granola with Yogurt or Milk
How to Store Crunchy Granola Without Softening
Print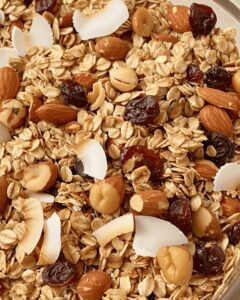
Homemade Maple Nut Granola Recipe
- Total Time: 40 minutes
- Yield: 11 1x
Description
Maple nut granola delivers a delightful breakfast symphony of toasted oats, nuts, and sweet maple essence. Crisp clusters pair perfectly with yogurt or milk, offering a wholesome morning treat you’ll crave repeatedly.
Ingredients
- 3 cups / 710 ml rolled oats
- 1 ½ cups / 355 ml chopped nuts (walnuts or pecans)
- ⅓ cup / 80 ml coconut oil
- ½ cup / 120 ml maple syrup
- ⅓ cup / 80 ml shredded coconut
- ⅓ cup / 80 ml dried cranberries
- 1 tbsp / 15 ml chia seeds
- 2 tbsps / 30 ml vanilla extract
- ½ tsp / 2.5 ml cinnamon
- ¼ tsp / 1.25 ml salt
Instructions
- Preparation: Preheat oven to 325°F and lightly grease a spacious baking sheet to prevent sticking.
- Mixing: Combine oats, chopped nuts, shredded coconut, spices, maple syrup, and coconut oil in a large mixing bowl, ensuring thorough blending of dry and wet ingredients.
- Spreading: Distribute the granola mixture evenly across the baking sheet, creating a uniform layer for consistent roasting.
- First Roasting: Place the baking sheet in the preheated oven and roast, carefully monitoring the mixture’s transformation.
- Midpoint Rotation: Remove the sheet after 15 minutes, gently redistribute the granola, turning sections to promote balanced caramelization and prevent burning.
- Final Roasting: Continue baking, pressing the mixture to encourage cluster formation, until the granola achieves a rich golden-brown color and crisp texture.
- Cooling: Remove from the oven and allow the granola to cool completely on the baking sheet, which helps create additional crunchy clusters.
- Finishing: Once cooled, fold in dried cranberries and chia seeds, ensuring even distribution throughout the mixture.
- Storage: Transfer to an airtight container, preserving the granola’s delightful crunch and flavor profile.
Notes
- Optimize Oven Placement: Position the rack in the center to ensure even heat distribution and prevent uneven browning or burning of the granola.
- Master Mixing Technique: Combine dry and wet ingredients thoroughly, pressing and coating each oat and nut for maximum flavor infusion and consistent caramelization.
- Control Moisture Balance: Gentle stirring during baking prevents soggy patches while promoting crispy, golden-brown clusters that hold together perfectly.
- Smart Storage Strategy: Cool granola completely before storing in an airtight container to maintain maximum crunchiness and prevent moisture absorption.
- Prep Time: 10 minutes
- Cook Time: 30 minutes
- Category: Breakfast, Snacks
- Method: Baking
- Cuisine: American
Nutrition
- Serving Size: 11
- Calories: 242
- Sugar: 10 g
- Sodium: 34 mg
- Fat: 12 g
- Saturated Fat: 6 g
- Unsaturated Fat: 6 g
- Trans Fat: 0 g
- Carbohydrates: 32 g
- Fiber: 4 g
- Protein: 4 g
- Cholesterol: 0 mg
Jessica Martin
Recipe Developer & Food Writer
Expertise
Recipe Development, Food Styling and Photography, Seasonal and Local Ingredients, Vegetarian and Vegan Cuisine, Culinary Education
Education
Portland Community College
Oregon Culinary Institute
Jessica Martin is a talented food writer and recipe creator who specializes in seasonal cooking and approachable home baking.
Educated at Portland Community College with additional pastry training from Oregon Culinary Institute, Jessica’s culinary journey spans nearly a decade of creating and sharing flavorful recipes.
Her deep appreciation for local ingredients shapes each of her recipes, making them both accessible and inspiring. At Beard and Bonnet, Jessica uses her cheerful, down-to-earth writing to help readers effortlessly bring new tastes and creative dishes into their daily routines.