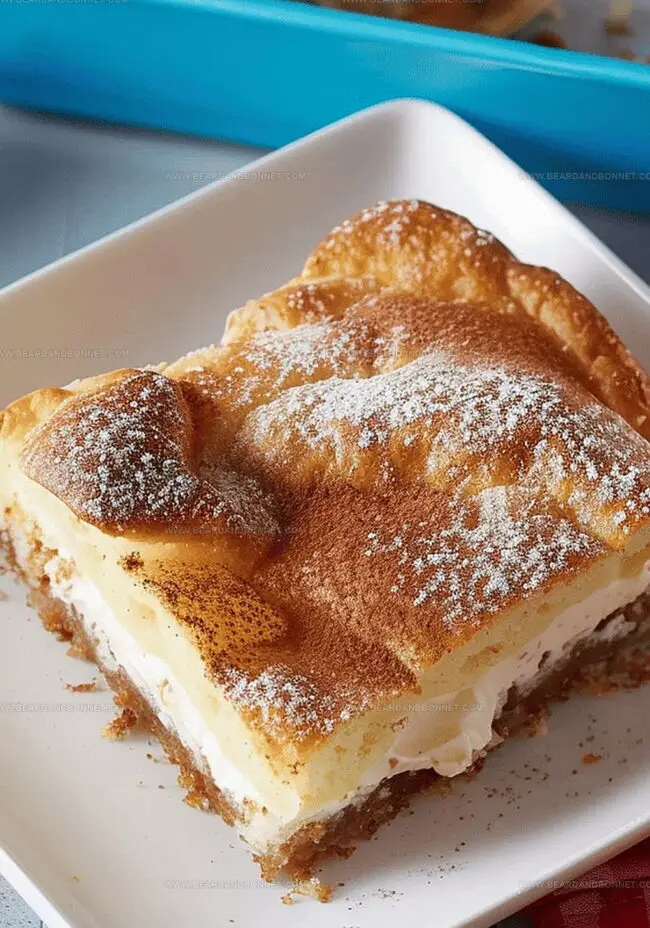
Soft, pillowy layers of pastry meet creamy cheesecake in this irresistible sopapilla cheesecake that will transport you straight to dessert heaven.
The combination of flaky dough and rich filling creates a magical treat that melts in your mouth.
Butter and cinnamon swirl together, promising a decadent experience that tingles every taste bud.
Mexicana-inspired desserts rarely get as indulgent as this crowd-pleasing recipe that takes mere minutes to assemble.
Each bite delivers a perfect balance of crispy exterior and luscious cream cheese center.
The sweet aroma will fill your kitchen, drawing everyone to the table with anticipation.
This dessert guarantees smiles and requests for seconds, making it the ultimate crowd-pleaser for any gathering.
Quick Recipe Overview
Prep Time: 15 minutes
Cook Time: 35 minutes
Total Time: 50 minutes
Calories: 289 kcal
Servings: 13
Sopapilla Cheesecake Ingredient Breakdown
For Base Layer:
Crescent Roll Dough: Provides a flaky, buttery foundation that creates a quick and easy pastry base with minimal effort.
Melted Butter: Adds rich flavor and helps create a golden, crispy top crust with beautiful browning.
For Creamy Filling:
Cream Cheese: Delivers a smooth, tangy core that makes the dessert luxuriously rich and gives a classic cheesecake-like texture.
Sugar: Balances the cream cheese’s tanginess and creates a perfectly sweet filling.
Vanilla Extract: Enhances overall flavor with its warm, aromatic notes and adds depth to the creamy mixture.
For Topping:
Sugar, Ground Cinnamon: Create a sweet, warm crumbly layer that caramelizes during baking, adding a delightful crunch and spicy-sweet dimension to the dessert.
Tools for Making Sopapilla Cheesecake
Electric mixer: Essential for beating cream cheese and sugar to smooth perfection.
Medium-sized bowl: Perfect for mixing cream cheese and sugar ingredients.
13×9-inch glass baking dish: Ideal for layering and baking the sopapilla cheesecake.
Measuring cups: Needed for precise sugar and ingredient measurements.
Spatula: Helpful for spreading cream cheese mixture evenly.
Knife: Used for cutting the dessert into bars after cooling.
Baking Sopapilla Cheesecake Easily
Dough Foundation
Spread the first layer of crescent roll dough across the bottom of a glass baking dish, smoothing out any bumps and sealing perforations carefully.
Creamy Filling
Whip cream cheese with sugar until silky smooth, blending in vanilla for extra richness. Gently spread this dreamy mixture over the dough base.
Topping Layer
Cover the cream cheese with the second crescent roll dough, pressing seams together to create a seamless blanket.
Butter and Spice
Drizzle melted butter across the top, then dust generously with a cinnamon-sugar mixture that will transform into a delightful golden crust.
Baking Magic
Slide the dish into a warm oven and bake until the top turns a gorgeous golden brown, about 30-35 minutes. The dessert should look set and slightly puffy when done.
Cooling and Serving
Let the sopapilla cheesecake rest and cool for half an hour. For clean, perfect slices, pop it in the refrigerator before cutting into squares of pure deliciousness.
Tips for Better Cinnamon-Sugar Layers
Sweet Crust Secrets: Press those crescent roll seams tightly to prevent filling from leaking during baking, ensuring a perfect pastry base every single time.
Cream Cheese Magic: Let cream cheese soften at room temperature for 30 minutes before mixing to achieve ultra-smooth, lump-free filling that spreads like silk.
Temperature Tricks: Allow the dessert to cool completely before slicing for clean, professional-looking bars that hold their shape beautifully when served.
Flavor Boosters: Experiment with adding orange zest to the cream cheese mixture or sprinkling chopped pecans over the cinnamon-sugar topping for extra crunch and depth of flavor.
Make-Ahead Magic: This dessert tastes even better the next day, so prepare it in advance for parties or potlucks, storing covered in the refrigerator for up to 3 days.
Serving Sopapilla Cheesecake Warm or Chilled
Sweet Brunch Companion: Pair this decadent sopapilla cheesecake with fresh coffee or a chilled glass of orange juice for a delightful morning treat that transforms your breakfast into a special occasion.
Dessert Elegance: Serve warm slices with a scoop of vanilla bean ice cream or a dollop of whipped cream to elevate the dessert’s richness and create a luxurious after-dinner indulgence.
Party Pleaser Platter: Cut into smaller squares and arrange on a decorative platter with fresh mint leaves or a light dusting of powdered sugar, making it perfect for potlucks, family gatherings, or casual celebrations where everyone loves a sweet bite.
Mexican-Inspired Side: Complement the dessert with a drizzle of caramel sauce or a sprinkle of cinnamon to highlight its subtle Latin American roots, creating a more authentic and flavorful experience for guests.
Best Storage for Sopapilla Cheesecake Squares
Smart Refrigeration Tactics: Wrap the cheesecake bars in aluminum foil or store in an airtight container to maintain freshness. Refrigeration extends its delicious life up to 5 days, keeping the texture soft and flavors vibrant.
Quick Freezing Method: Slice the dessert into individual portions before freezing. Place wax paper between layers to prevent sticking. Frozen bars stay delectable for 2-3 months when sealed in freezer-safe containers.
Temperature Revival Technique: Thaw refrigerated bars at room temperature for 15-20 minutes before serving. Microwave individual pieces for 10-15 seconds if you prefer a slightly warm treat with that fresh-baked sensation.
Serving Suggestion Strategy: Remove cheesecake from refrigerator 30 minutes prior to serving to soften edges. Cut clean squares using a sharp knife wiped with hot water between slices for picture-perfect presentation that impresses family and guests.
Recipe Development, Food Styling and Photography, Seasonal and Local Ingredients, Vegetarian and Vegan Cuisine, Culinary Education
Education
Portland Community College
Degree: Associate of Applied Science in Culinary Arts
Focus: Comprehensive training in culinary techniques, kitchen management, and food safety. Gained hands-on experience in preparing diverse cuisines and understanding flavor profiles
Oregon Culinary Institute
Program: Baking and Pastry Certificate
Focus: Specialized education in baking fundamentals, pastry arts, and dessert presentation. Emphasized creativity and precision in crafting baked goods.
Jessica Martin is a talented food writer and recipe creator who specializes in seasonal cooking and approachable home baking.
Educated at Portland Community College with additional pastry training from Oregon Culinary Institute, Jessica’s culinary journey spans nearly a decade of creating and sharing flavorful recipes.
Her deep appreciation for local ingredients shapes each of her recipes, making them both accessible and inspiring. At Beard and Bonnet, Jessica uses her cheerful, down-to-earth writing to help readers effortlessly bring new tastes and creative dishes into their daily routines.


Jessica Martin
Recipe Developer & Food Writer
Expertise
Recipe Development, Food Styling and Photography, Seasonal and Local Ingredients, Vegetarian and Vegan Cuisine, Culinary Education
Education
Portland Community College
Oregon Culinary Institute
Jessica Martin is a talented food writer and recipe creator who specializes in seasonal cooking and approachable home baking.
Educated at Portland Community College with additional pastry training from Oregon Culinary Institute, Jessica’s culinary journey spans nearly a decade of creating and sharing flavorful recipes.
Her deep appreciation for local ingredients shapes each of her recipes, making them both accessible and inspiring. At Beard and Bonnet, Jessica uses her cheerful, down-to-earth writing to help readers effortlessly bring new tastes and creative dishes into their daily routines.