Sweet autumn afternoons call for a comforting dessert that marries the warmth of baked apples with a creamy cheesecake delight recipe that melts in your mouth.
Crisp orchard apples transform into a decadent treat that captures the essence of seasonal indulgence.
Soft cream cheese blends seamlessly with tender, caramelized fruit for a dessert that surprises and satisfies.
Layers of rich flavor combine in this simple yet impressive dish that looks like it came straight from a gourmet bakery.
Each bite promises a perfect balance of tangy and sweet notes that dance across your palate.
The aroma of cinnamon and baked fruit will draw everyone to the kitchen, eager to taste this irresistible dessert.
Dive into this recipe and let the magic of fall unfold on your plate.
Quick Recipe Overview
Prep Time: 15 minutes
Cook Time: 25 minutes
Total Time: 40 minutes
Calories: 150 kcal
Servings: 7
Cheesecake Baked Apples Ingredient List
For Base Ingredients:
Apples: Select firm, crisp varieties like Honeycrisp or Granny Smith that hold their shape during baking and provide a perfect edible vessel for the creamy filling.
Cream Cheese: Ensures a luxuriously smooth and rich cheesecake-style stuffing with a tangy, velvety texture.
For Filling Enhancers:
Sugar: Balances the tartness of apples and adds sweetness to the creamy filling.
Vanilla: Brings warm, aromatic depth and complements both apple and cream cheese flavors.
Egg: Provides structure and helps the filling set beautifully during baking.
Cinnamon: Adds warm, spicy notes that perfectly complement the apple’s natural sweetness.
For Baking Essentials:
Baking Sheet: Creates a stable surface for even heat distribution and easy apple transportation.
Tools for Stuffed Baked Apple Prep
Baking Sheet: Essential for holding apples during baking and catching any potential drips.
Melon Baller or Spoon: Perfect for carefully hollowing out apple centers without damaging the fruit.
Medium Mixing Bowl: Ideal for combining cream cheese mixture smoothly and efficiently.
Whisk or Electric Mixer: Great for blending cream cheese, sugar, and other filling ingredients until creamy.
Sharp Knife: Useful for cleanly cutting apple tops and preparing fruit for filling.
Measuring Cups and Spoons: Necessary for precise ingredient measurements to ensure recipe success.
Baking Apples With Cheesecake Filling Easily
Cozy Apple Cheesecake Surprise
Apple Preparation Carefully remove apple tops and hollow out centers, keeping apple walls sturdy and whole. Remove seeds and core completely.
Creamy Filling Creation Blend cream cheese with sugar until silky smooth. Gently mix in vanilla, egg, and cinnamon until perfectly combined.
Stuffing Magic Generously fill each apple with cheesecake mixture, leaving a little space at the top for expansion during baking.
Baking Adventure Place apples on baking sheet, ensuring they aren’t touching. Slide into preheated oven at 350 degrees Fahrenheit and bake for 20-25 minutes until filling sets beautifully.
Cooling Transformation Remove from oven and let cool completely in refrigerator. This helps flavors meld and filling firm up, creating a delightful dessert experience.
Flavor Tips for More Spice or Sweetness
Cheesy Apple Magic: Transform ordinary baked apples into a decadent dessert with these pro tips and creative twists.
Texture Perfection: Choose firm, crisp apples like Honeycrisp or Granny Smith that hold their shape during baking and provide a delightful contrast to the creamy cheesecake filling.
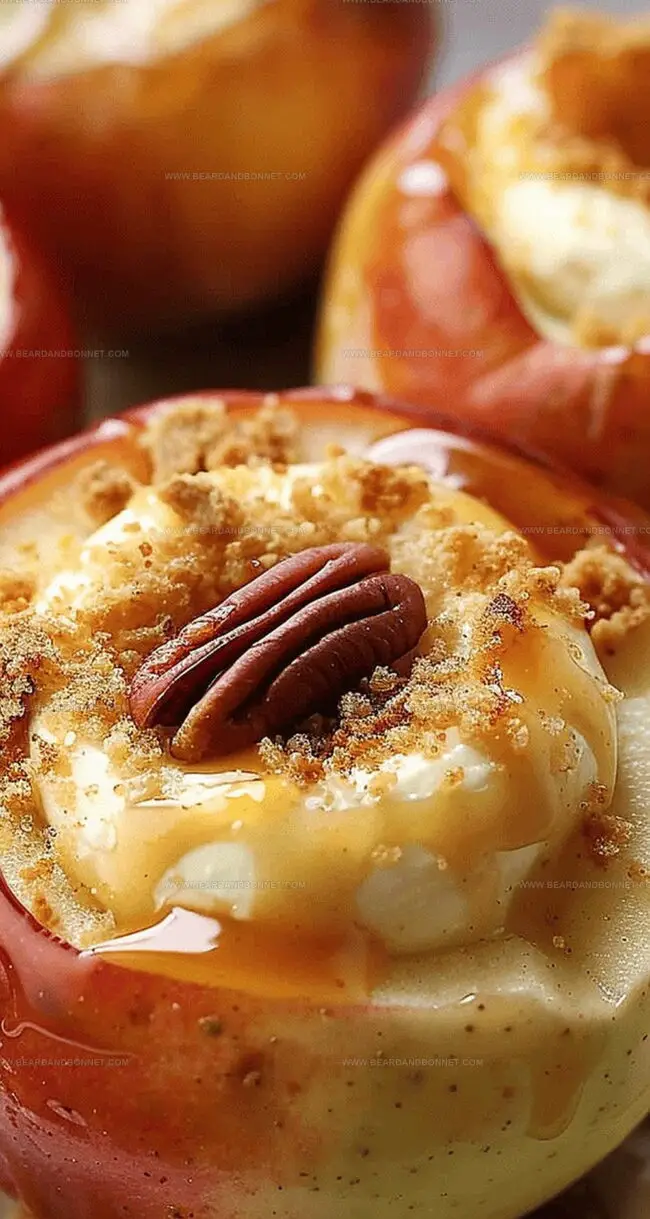
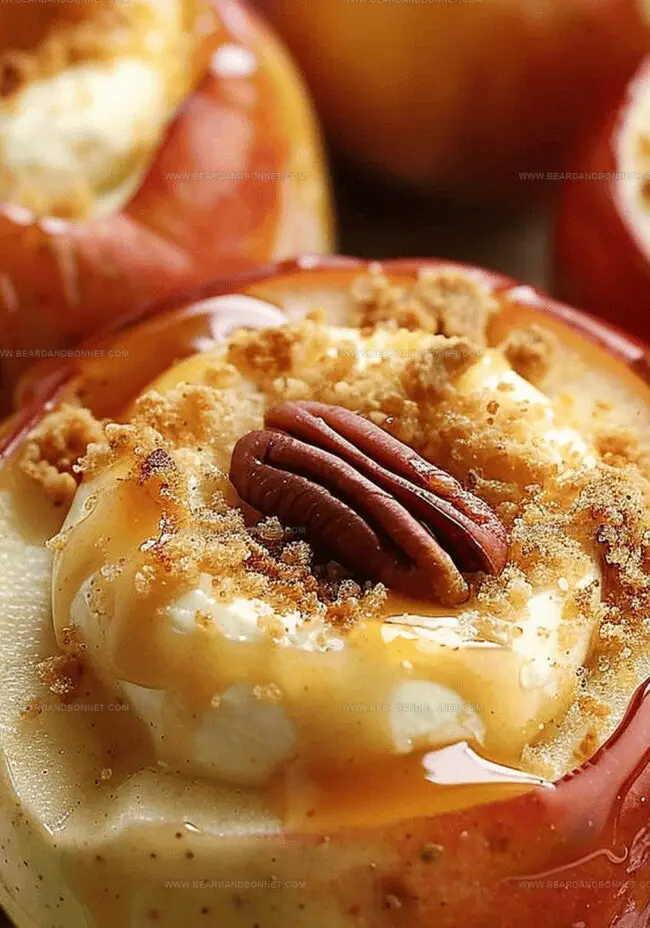
Flavor Boosters: Experiment with mix-ins like chopped pecans, caramel drizzle, or a sprinkle of graham cracker crumbs to elevate the classic cheesecake apple experience.
Make-Ahead Miracle: Prep these stuffed apples up to a day in advance and store them covered in the refrigerator. Simply reheat gently before serving to maintain their luscious texture and warm appeal.
Gluten-Free Friendly: This recipe naturally works for gluten-sensitive guests, making it a versatile dessert option that everyone can enjoy without modification.
Ways to Serve These Apples at Dessert Time
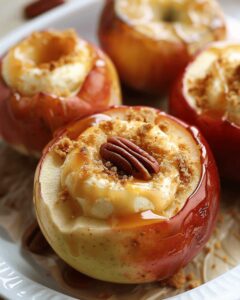
Dessert Companion Pairings: Drizzle warm caramel sauce over the baked apples for an extra decadent touch that complements the creamy cheesecake filling.
Texture Contrast Technique: Sprinkle crushed pecans or walnuts on top to add a delightful crunch that balances the soft, creamy apple filling.
Seasonal Serving Style: Garnish with a small scoop of vanilla bean ice cream to create a refreshing and elegant dessert that elevates the warm baked apple experience.
Presentation Flair: Dust lightly with ground cinnamon or powdered sugar just before serving to add a beautiful finishing touch that makes the dessert look professionally prepared.
Save and Reheat Without Sogginess
Quick Chill Strategy: Refrigerate the baked apples within 2 hours of cooking to maintain optimal freshness and prevent bacterial growth.
Fridge Storage Technique: Place cooled apples in an airtight container, where they’ll stay delicious for 3-4 days. Layer with parchment paper to prevent sticking and preserve their beautiful presentation.
Freezing Magic: Wrap individual baked apples tightly in plastic wrap, then aluminum foil. Freeze up to 2 months for a make-ahead dessert option. Thaw overnight in the refrigerator before serving to retain texture and flavor.
Serving Temperature Tip: Let refrigerated apples sit at room temperature for 15 minutes before serving. This gentle warming helps soften the cheesecake filling and brings out the rich, creamy texture, making each bite more enjoyable.
Grandma’s cheesecake delight baked apples combine classic comfort with elegant dessert innovation. Sweet-tart apple shells cradle creamy cheesecake filling, offering warm nostalgia that welcomes you to savor each delightful spoonful.
Ingredients
Scale
6 gala apples
8 oz (226 g) cream cheese, softened
1 egg
¼ cup (50 g) sugar
1 tsp cinnamon
1 tsp vanilla extract
Instructions
Preparation: Slice apple tops, creating wide openings and carefully hollow out cores using a melon baller, maintaining apple structure.
Cheesecake Filling: Whip cream cheese and sugar until silky smooth, then integrate vanilla, egg, and cinnamon into a uniform mixture.
Stuffing Technique: Gently fill apples to two-thirds capacity with cheesecake mixture, ensuring no overflow potential.
Baking Process: Position apples on a baking sheet with adequate spacing, then roast in a preheated oven at 350°F for 20-25 minutes until cheesecake filling sets completely.
Finishing Touch: Transfer baked apples to a serving plate and refrigerate, allowing flavors to intensify and filling to solidify, creating a decadent dessert experience.
Notes
Choose the Right Apples: Select firm, round baking apples like Honeycrisp or Granny Smith that hold their shape during baking and provide a tart contrast to the sweet cheesecake filling.
Prevent Apple Browning: Quickly rub the apple’s interior with lemon juice after coring to stop oxidation and maintain a fresh, appetizing appearance.
Master the Filling Technique: Avoid overfilling the apples to prevent cheesecake spillage; leave about one-third of the cavity empty for proper expansion during baking.
Cooling is Crucial: Allow the baked apples to cool completely before refrigerating, ensuring the cheesecake filling sets properly and develops a rich, creamy texture.
Recipe Development, Food Styling and Photography, Seasonal and Local Ingredients, Vegetarian and Vegan Cuisine, Culinary Education
Education
Portland Community College
Degree: Associate of Applied Science in Culinary Arts
Focus: Comprehensive training in culinary techniques, kitchen management, and food safety. Gained hands-on experience in preparing diverse cuisines and understanding flavor profiles
Oregon Culinary Institute
Program: Baking and Pastry Certificate
Focus: Specialized education in baking fundamentals, pastry arts, and dessert presentation. Emphasized creativity and precision in crafting baked goods.
Jessica Martin is a talented food writer and recipe creator who specializes in seasonal cooking and approachable home baking.
Educated at Portland Community College with additional pastry training from Oregon Culinary Institute, Jessica’s culinary journey spans nearly a decade of creating and sharing flavorful recipes.
Her deep appreciation for local ingredients shapes each of her recipes, making them both accessible and inspiring. At Beard and Bonnet, Jessica uses her cheerful, down-to-earth writing to help readers effortlessly bring new tastes and creative dishes into their daily routines.

Jessica Martin
Recipe Developer & Food Writer
Expertise
Recipe Development, Food Styling and Photography, Seasonal and Local Ingredients, Vegetarian and Vegan Cuisine, Culinary Education
Education
Portland Community College
Oregon Culinary Institute
Jessica Martin is a talented food writer and recipe creator who specializes in seasonal cooking and approachable home baking.
Educated at Portland Community College with additional pastry training from Oregon Culinary Institute, Jessica’s culinary journey spans nearly a decade of creating and sharing flavorful recipes.
Her deep appreciation for local ingredients shapes each of her recipes, making them both accessible and inspiring. At Beard and Bonnet, Jessica uses her cheerful, down-to-earth writing to help readers effortlessly bring new tastes and creative dishes into their daily routines.