
Whip Up Jolly Peppermint Cream Discs: A Sweet Holiday Recipe
Festive holiday gatherings call for sweet treats that spark joy, and these delightful peppermint cream discs dance with refreshing minty magic.
Winter celebrations shine brightest with simple yet elegant desserts that everyone adores.
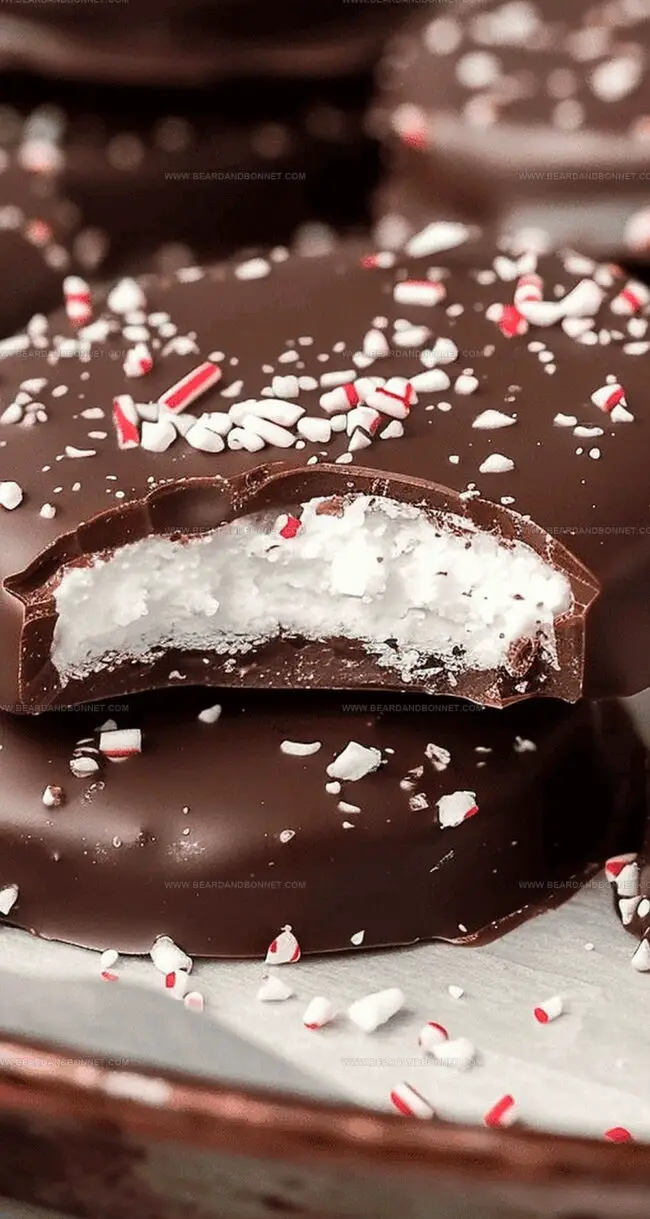
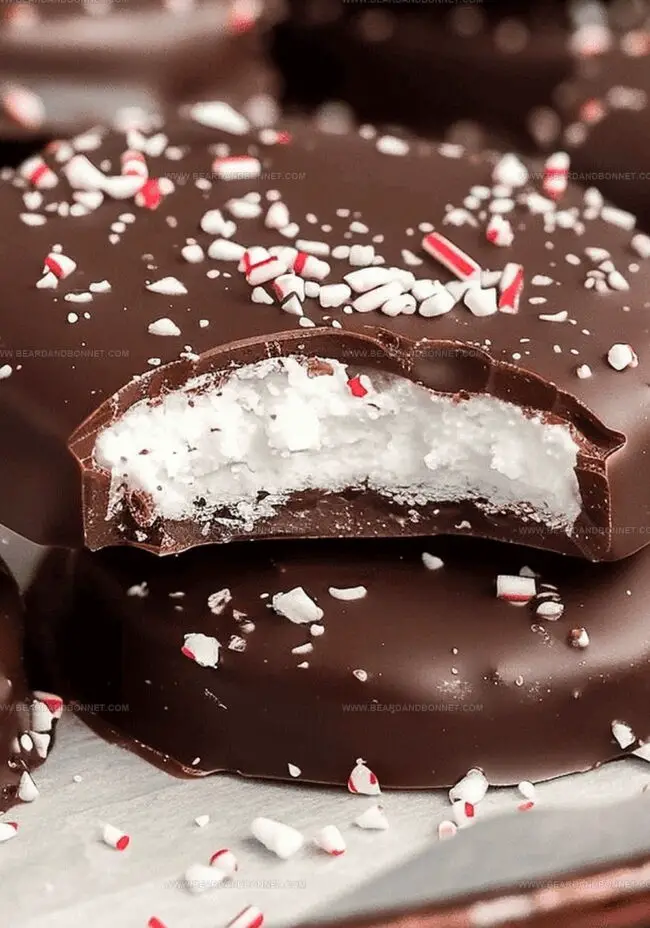
Delicate and smooth, these cream discs blend creamy textures with cool peppermint flavor.
Each bite delivers a crisp, cool sensation that melts effortlessly on your tongue.
Soft white chocolate provides a luxurious backdrop for the bright mint notes dancing through these irresistible confections.
Light and airy, these discs promise to become an instant favorite at any seasonal celebration.
Prepare to delight your guests with a treat that captures the essence of winter’s most magical moments.
Quick Recipe Overview
Ingredients for Peppermint Cream Discs
For Base Mixture:For Coating and Decoration:For Equipment:Tools That Help With Chilling and Shaping Discs
How to Make These Cool and Minty Cookies
Line a baking sheet with parchment paper and clear freezer space for your delightful treats.
In a large bowl, blend sweetened condensed milk with peppermint extract until smooth and fragrant.
Gradually mix confectioners sugar into the milk mixture using an electric mixer, creating a firm, manageable dough.
Roll the dough into small balls, gently pressing each on the prepared baking sheet to form thick, uniform discs.
Place the tray in the freezer, allowing the discs to set and become firm for about an hour.
Melt chocolate almond bark in a microwave-safe bowl, stirring between 30-second intervals until silky and completely liquid.
Carefully dip each chilled peppermint disc into the melted chocolate, ensuring full coverage and gently shaking off excess.
Optional: Sprinkle decorations on the chocolate-covered discs while still wet.
Let the chocolate set at room temperature or speed up the process by chilling in the refrigerator.
Flavor Ideas to Enhance the Peppermint Kick
Serving Peppermint Discs on Holiday Trays
Keeping These Cookies Fresh in Storage
Print
Dreamy Peppermint Cream Discs Recipe
- Total Time: 30 minutes
- Yield: 21 1x
Description
Signature peppermint cream discs combine festive holiday flavors with delicate chocolate coating. Mint lovers will delight in these crisp, cool confections that melt smoothly on palates and create sweet seasonal memories.
Ingredients
- 1 pound chocolate almond bark
- 4 cups (480 g) confectioners sugar
- 1 cup (240 ml) sweetened condensed milk
- 1 tsp peppermint extract
- Sprinkles (optional)
Instructions
- Workspace Preparation: Line a baking sheet with parchment paper and clear freezer space for chilling.
- Mixture Creation: Combine sweetened condensed milk and peppermint extract in a mixing bowl, whisking until thoroughly blended, forming an aromatic base.
- Dough Formation: Integrate confectioners sugar using an electric mixer on low speed, developing a firm, cohesive dough that cleanly separates from bowl edges.
- Disc Shaping: Roll peppermint dough into small spheres, then flatten each ball into smooth, uniform discs using fingertip pressure directly on the prepared baking sheet.
- Chilling Process: Transfer baking sheet to freezer, allowing peppermint discs to solidify completely for approximately one hour.
- Chocolate Coating: Melt chocolate almond bark in a microwave-safe bowl, using 30-second intervals and stirring consistently to achieve a smooth, glossy consistency.
- Dipping Technique: Remove chilled discs from freezer and immerse each one into molten chocolate, ensuring comprehensive coverage while allowing excess to drip off.
- Finishing Touches: Immediately sprinkle decorative toppings onto chocolate-coated discs while coating remains wet, then allow to set at room temperature or accelerate hardening in refrigerator.
Notes
- Chill Before Coating: Freezing the peppermint discs ensures they maintain shape during chocolate dipping and prevents crumbling.
- Chocolate Melting Technique: Use short microwave intervals and stir frequently to prevent chocolate from burning or seizing.
- Perfect Dipping Trick: Tap excess chocolate gently off each disc to create a thin, smooth chocolate shell without pooling.
- Topping Timing: Sprinkle decorations immediately after dipping while chocolate remains wet for best adhesion and presentation.
- Prep Time: 30 minutes
- Cook Time: 0 minutes
- Category: Desserts, Snacks
- Method: Mixing
- Cuisine: American
Nutrition
- Serving Size: 21
- Calories: 158
- Sugar: 25 g
- Sodium: 52 mg
- Fat: 6 g
- Saturated Fat: 3.5 g
- Unsaturated Fat: 2.5 g
- Trans Fat: 0 g
- Carbohydrates: 24 g
- Fiber: 0 g
- Protein: 1 g
- Cholesterol: 3 mg
Jessica Martin
Recipe Developer & Food Writer
Expertise
Recipe Development, Food Styling and Photography, Seasonal and Local Ingredients, Vegetarian and Vegan Cuisine, Culinary Education
Education
Portland Community College
Oregon Culinary Institute
Jessica Martin is a talented food writer and recipe creator who specializes in seasonal cooking and approachable home baking.
Educated at Portland Community College with additional pastry training from Oregon Culinary Institute, Jessica’s culinary journey spans nearly a decade of creating and sharing flavorful recipes.
Her deep appreciation for local ingredients shapes each of her recipes, making them both accessible and inspiring. At Beard and Bonnet, Jessica uses her cheerful, down-to-earth writing to help readers effortlessly bring new tastes and creative dishes into their daily routines.